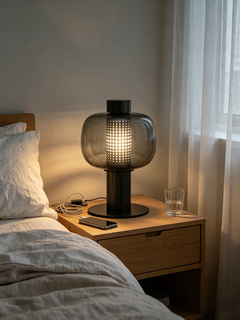
Formakami Rice Paper Table Lamp

SKU: M202607262-1
Availability : In stock Pre order Out of stock
Free shipping and customs duties for US customers
$255.00

Size: Dia 38cm x H 50cm / ∅ 15″ x H 19.7″

Dia 38cm x H 50cm / ∅ 15″ x H 19.7″

Color: Black & White

Black & White

Plug Options: US plug

US plug
UK plug
AU plug
EU plug

Guarantee safe & secure checkout

Description
Product Video
Overview

The Solaine Paper Lantern Table Lamp is a rice paper shade held in a slim frame of lacquered oak. The paper does the work an ordinary shade cannot: instead of directing light out of an opening, the whole surface turns luminous, so there is no bright edge and no hot spot anywhere on it.

The frame is the counterweight. Its dark verticals give the soft mass of paper a drawn outline and keep the lamp from reading as a shapeless glow. At 15″ across and 19.7″ tall this is a lantern rather than a bedside accessory — large enough to light a corner on its own. Supplied in black and white, with 59″ of cord, an in-line switch and a choice of US, UK, EU or AU plug.

Signature Finish
Rice paper shade · lacquered oak frame · in-line switch
White Paper Black Frame US / UK / EU / AU Plug
Product Highlights
The Whole Shade Glows

Paper lights up across its entire surface, so there is no bright spot to look away from.

Black Frame, White Paper

The dark oak verticals draw an outline around the soft mass, keeping the silhouette sharp.

Bigger Than It Looks Online

At 15″ wide and 19.7″ tall it lights a whole corner rather than just a nightstand.

Materials & Craft
Rice paper shade and lacquered oak frame detail of the Solaine Paper Lantern Table Lamp Paper & Oak

Two Materials, One Job Each.

The shade is rice paper, chosen because its long fibres scatter light evenly instead of letting it pass straight through. The frame is oak, sanded smooth and finished in black lacquer so the grain reads as texture rather than colour.

Rice Paper

Stretched over the frame by hand. Fine variation in fibre and tone across the surface is inherent to the material.

Lacquered Oak

Polished before lacquer — a finish shows every mark left underneath it, so the sanding has to come first.

Cord & Switch

59″ of cord with an in-line switch you can reach without leaning over the shade. Four plug standards available.

Specifications
Light Source
 E26 or E27 medium base · 60W max · bulb not included
Dimming
Depends on the bulb — fit a dimmable lamp and the fixture dims
Voltage
AC 110–240 V
Diameter × Height
Ø 15″ × H 19.7″ / Dia 38 cm × H 50 cm
Material
Rice paper · Oak
Finish
White paper Black lacquered frame
Cord & Switch
150 cm / 59″ · in-line switch · US, UK, EU or AU plug
Placement
Table or floor-standing · indoor, dry location
Best For
Bedsides · consoles · reading corners · sideboards
Use & Care
Dust the paper with a dry anti-static duster — never a damp cloth
Where It Fits

Nearly 20″ tall, this sits closer to a small floor lamp than a table lamp. Give it depth as well as width — a surface at least 18″ deep keeps the shade off the wall and away from anything that gets knocked.

Bedside Needs a wide nightstand

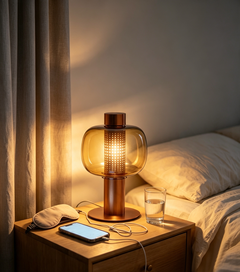
The soft, even output suits a room you are winding down in. Because the shade is 15″ across it wants a generous nightstand — measure before you commit.

Console & Sideboard Best fit

The strongest position. On a long console it anchors one end and leaves the rest of the surface free, and the height fills wall space that a low lamp would leave empty.

Reading Corner Ambient, not task

Diffused light fills a corner comfortably but does not concentrate on a page. Pair it with a directional reading light rather than asking it to do both jobs.

Floor, Beside a Chair Low-light corner

Stood directly on the floor it reads as a lantern set down rather than a lamp missing its table — a good answer for a corner with no surface to work with.

FAQ
How big is it really?

The shade is 15″ across and the lamp stands 19.7″ tall — taller than most table lamps and closer in presence to a small floor lamp. On a narrow nightstand it will overhang, so check your surface depth before ordering.

Can I dim it?

That depends on the bulb, not the lamp. Fit a dimmable  E26 or E27 lamp and use a plug-in or smart dimmer and it dims normally; a standard non-dimmable bulb will not. There is no dimmer built into the fixture — the in-line switch is on/off.

Which bulb should I use?

One  E26 or E27 medium-base lamp up to 60W. Bulbs are not included. A 2700K LED reads warmest through the paper and keeps heat low, which matters more here than in a metal or glass fixture.

Is paper safe around a bulb?

Yes, at the rated wattage and with the frame keeping the paper clear of the lamp. Stay at or below 60W, use LED where you can, and never let the paper touch the bulb.

Does the plug match my country?

Choose US, UK, EU or AU at checkout and the lamp ships with that plug fitted. The fixture itself runs on AC 110–240 V, so it works anywhere in that range.

Where is the switch?

In-line on the cord, so you can reach it without leaning across the shade. The cord is 150 cm / 59″ long and can be supplied longer on request.

Will the paper yellow or tear?

Rice paper is durable in normal indoor use but it is still paper — keep it out of direct sunlight, away from damp rooms, and out of reach of pets. Replacement shades can be supplied; contact us with your order number.

How do I clean it?

Dust the shade with a dry anti-static duster or a soft brush. Never use a damp cloth or any cleaning liquid on paper. The lacquered frame can be wiped with a barely damp cloth and dried straight away.

Does the paper look identical on every lamp?

No. Fibre distribution and tone vary slightly across sheets, which is visible when the lamp is lit. That variation is characteristic of the material rather than a fault.

What if it arrives damaged?

Paper and wood are packed in a fitted carton, but transit damage is still possible. Photograph the carton and the lamp and contact us within 48 hours of delivery and we will arrange a replacement shade or a new lamp.

Return & Exchange

Thank you for your purchase. We hope you are happy with your purchase. However, if you are not completely satisfied with your purchase for any reason, you may return it to us for [a full refund], or [an exchange]. Please see below for more information on our return policy. Please see below for more information on our return policy.

RETURNS

All returns must be made within [30] days of the delivered date. All returned items must be in new and unused condition, with all original tags and labels attached.

RETURN PROCESS

To return an item, please email customer service at support@metavaya.com to obtain a Return Merchandise Authorization. place the item securely in its original packaging, and mail your return to our warehouse.
Please note, you will be responsible for all return shipping charges.

REFUNDS

After receiving your return and inspecting the condition of your item, we will process your [return] or [exchange]. Please allow at least [7] days from the receipt of your item to process your [return] or [exchange]. Refunds may take 1-2 billing cycles to appear on your credit card statement, depending on your credit card company. We will notify you by email when your return has been processed.

EXCEPTIONS

The following items cannot be [returned] or [exchanged]:

  • The lamps have been installed and used or the installation is damaged
  • Fragile products damaged in transit (glass, wood, paper),can be resent for free
  • Customized product

For defective or damaged products, please contact us at the contact details below to arrange a refund or exchange.
Please Note:Sale items are FINAL SALE and cannot be returned.

If you have any questions concerning our return policy, please contact us at: support@metavaya.com

Lighting customization service

Customization


Customize Your Lighting Solution | Metavaya Tailored Services

Craft Your Unique Lighting

At Metavaya, we provide comprehensive customization services to ensure your lighting perfectly fits your space and style. Whether you prefer modern minimalism, industrial chic, or timeless elegance, we are here to craft unique lighting fixtures that bring out the best in your space.


Customization Process

1. Understand Your Needs

Start by connecting with our experts via live chat or email and share the following details:

  • Design Style: Choose from a variety of styles, including modern, vintage, and minimalist.
  • Material and Color: Select materials like metal or glass and pick a finish that complements your space.
  • Size and Shape: Customize the dimensions and shape to fit your room perfectly.
  • Functional Features: Add dimming capabilities, customize lighting color, and more.

2. Confirm Your Design

  • CAD Design Drawings: Receive professional design drawings to visualize your fixture with precision.
  • 3D Rendering: Preview the fixture in your space with detailed 3D renderings, allowing for adjustments until it’s perfect.

3. Production and Delivery

  • Skilled Craftsmanship: Once the design is finalized, our artisans carefully craft the lighting fixture with meticulous attention to detail.
  • On-Time Delivery: We deliver the finished product as promised, along with clear installation guidance to make the process seamless.

Contact Us

We’re here to help you every step of the way!

  • Live Chat: Workday 8:00 AM - 10:00 PM, Weekend 8:00 AM - 6:00 PM. Speak with our experts directly for personalized advice.
  • Email: Reach us at support@metavaya.com, and we’ll respond within 24 hours.
  • Phone Consultation: Call us at +86 181 9024 2203 to discuss your requirements with our design team.

    Frequently Asked Questions

    • Q: How much does custom lighting cost?
      A: Pricing depends on the complexity of the design, materials, and dimensions. Contact us for a personalized quote.

    • Q: What is the production and delivery time?
      A: It typically takes 4 to 7 weeks, depending on the order's complexity.

    • Q: Do you offer global shipping?
      A: Yes, we provide worldwide shipping, with fees calculated based on destination and order size.


    Start Your Custom Lighting Journey

    Contact us today to begin creating your bespoke lighting fixture, and let Metavaya illuminate your space with brilliance and style!

    Lighting Size & Installation Guide

    How to Choose the Perfect Light Fixture Size for Any Room

    Selecting the right size light fixture is essential to achieving both functional lighting and balanced aesthetics. A fixture that’s too small can feel underwhelming, while one that’s too large can overwhelm the space. Use the following guidelines and tips to find the perfect light fixture size for your room.


    General Guidelines for Sizing Light Fixtures

    1. Calculate the Diameter

    Use this simple formula to determine the ideal diameter for your light fixture:

    • Measure the room's length and width (in feet).
    • Add the two measurements together.
    • Convert the total to inches to determine the fixture’s recommended diameter.

    Example: 18 feet (Room Length) + 12 feet (Room Width) = 30 feet; The chandelier should be about 30 inches for its diameter

    2. How to determine the chandelier’s height

    To find the ideal height for a fixture:

      Measure the space’s floor to ceiling distance in feet, multiple by 2.5 will be the approximate height for the chandelier in inches. This rule mainly apply to pendant style chandelier while not necessarily apply to ceiling style chandelier.

      Example: For example 10 feet (Room Height), 10*2.5 = 25 The chandelier should be about 25 inches for its height

      3. How to determine the appropriate height for hanging a chandelier

      If you are hanging the chandelier on an open floor, chandelier’s bottom should at least be 7.5 feet away from the floor.

      If you are hanging the chandelier above a dining table or kitchen island, chandelier’s bottom should be 30 to 36 inches away from the tabletop.

      Other rules and tips apply to different types of spaces.

      Besides those general rules that apply to most spaces, there are other rules and tips for different areas, like what size chandelier should be used for the dining room and what about foyers?

      Dining Room & Kitchen island

      If you are hanging the chandelier above your dining table or kitchen island, you can also decide the size of the chandeliers based on the size of your dining table or kitchen island. We generally recommend that the length or diameter of the chandelier should be between 1/2 and 3/4 of the length of the dining table or kitchen island.

      For example, let's say that you have a dining table with 60 inches in length. The chandelier should be between 30 (60 x 1/2) to 45 (60 x 3/4) inches in diameter or length (Same here 1/2 to 3/4 of the kitchen island length)

      Two-Story Foyer with Staircase

      Besides the general rule that the chandelier’s bottom should be at least 7 and a half feet away from the floor. For two stories, what you also need to consider is how will it look from the second floor. In general, staircase chandeliers will be a good choice for space. In term of placing, below are two commonly seen guidance:

      • The general guideline is to use the second floor as a reference point. Hanging the chandelier slightly lower than or at the top of the staircase. This way, when you are at the top of the staircase, the top of the chandelier will be at your eye-level.
      • On the other hand, many designers advocate for independent placement just to make the chandelier the focal point or placing the chandelier about another architectural features. For example. if there is a large transparent window above the door, it should be centered in the window for best visual result from outside.

      Long Hallways

      Chandelier size for hall ways should be determined by the width of the hallway. Multiple the hallway’s width in feet by 2.5 will be the diameter of the chandelier in inches.


      For example, the hallway’s width is 8 feet. The chandelier’s diameter should be about 20 (8 x 2.5) inches

      If you want to decorate with chandelier for your long hallways. We always recommend having them

      • Centered in the middle of the hallway
      • Spaced between 8 and 10 feet apart
      • At least 7 and half feet clearance from floor to bottom of chandelier.
      Popular Science on Lighting Color Temperature

      General Product Features for Lighting Fixtures

      Important Note: The features described below apply generally to our lighting fixtures. They do not guarantee that the specific product you are viewing includes these features. Please refer to the Description section of the product page to verify its functionalities.

      1. Dimmable Version:

        • Equipped with a remote control, allowing you to adjust both brightness and color temperature.
        • Not compatible with wall-mounted dimmer switches.
      2. Three-Color Switch-Controlled Version:

        • Operates using your existing wall switch, enabling selection among three preset color temperatures.
        • Does not have a memory function; upon turning off and on again, the light resets to its default setting.
        • Cannot be set to maintain a single light source permanently.

      Understanding Color Temperature (Measured in Kelvin)

      Color temperature defines the visual tone of light, influencing the ambiance and functionality of your space. Here's a guide to help you choose:

      • Warm White (2700-3300K):
        Provides a soft, inviting glow, ideal for creating cozy and relaxing atmospheres in living rooms, bedrooms, and dining areas.

      • Neutral Light (3300-5300K):
        Offers bright, balanced illumination similar to natural daylight. Perfect for kitchens, bathrooms, offices, and retail spaces where clarity and focus are key.

      • Cool White (5300-6500K):
        Produces a crisp, energizing light, enhancing focus and productivity. Best suited for task-oriented spaces such as workshops, garages, and display areas.

      Tip: Select the color temperature based on the activities and mood you want to establish in your space to ensure both functional and aesthetic harmony.

      Mounting Bracket Hole Drilling Guide

      Installation Notice: Mounting Bracket Hole Drilling Guide

      Precise Dimensions | Installation Standards | Pro Safety

      This guide provides general installation notes for drilling and mounting bracket systems to ensure safe and stable fixture support. Since mounting plates and structural designs may vary across different lighting models, exact hole positions should always be determined according to the actual hardware provided with each product. Before installation, carefully verify the bracket structure and ensure all anchors or fasteners are properly selected and securely installed. All fixing points should be fully seated and flush with the mounting surface to guarantee proper load-bearing performance and long-term safety.

      I. Pre-Installation Essentials

      Wall Requirements

      Install on solid brick or concrete. NO hollow bricks or gypsum boards. Ensure wall flatness within 0.5mm error.

      Drilling Specs

      Confirm bracket hole positions before drilling. Sizes vary by fixture. Each ceiling plate requires specific measurement for alignment.

      Safety Load

      Standard Duty: ≤15kg. Heavy Duty: 30-50kg. Fix every 40-50cm. Double-person install required for large appliances.

      II. Preparation & Tools

      Essential Tools:
      Impact Drill Spirit Level Tape Measure Marker Screwdriver Hammer
      Consumables:
      Expansion Anchors Self-tapping Screws Waterproof Sealant Shims

      III. Model Specifications & Image Guide

      1. Octagonal Brackets Series

      A1 Octagonal Bracket
      A2 Octagonal Bracket
      A3 Octagonal Bracket
      A4 Octagonal Bracket
      A8 Octagonal Bracket
      Edge-Trimming Octagonal Bracket
      B-Type Butterfly Bracket

      2. Swivel & Cross Brackets

      105 Swivel Cross
      2-in-1 Swivel Cross (Color Zinc)
      2-in-1 Swivel Cross (White Zinc)

      3. Straight Hooks (Linear Series)

      US Standard Straight (White Zinc)
      70MM Iron Sheet Hook
      70MM Straight Hook
      80MM Straight Hook
      95MM Straight Hook
      100MM Straight Hook
      100MM US Standard Straight Hook
      100MM Cross Hook

      4. Open & Multi-functional Brackets

      75MM Open-Slot Bracket
      95MM Open-Slot Bracket
      115MM Open-Slot Bracket
      75MM Multi-functional Closed Bracket
      95MM Multi-functional Closed Bracket
      115MM Multi-functional Closed Bracket

      5. Specialty & Fan Brackets

      90MM Hat-Shaped Bracket
      110MM Hat-Shaped Bracket
      125MM Hat-Shaped Bracket

      Additional Specialty Hooks

      105MM Folded Octagonal Hook
      102MM US Octagonal Hook
      80MM Fan Hook

      IV. Standardized Installation Steps

      • Marking: Use a spirit level to ensure horizontal alignment. Mark hole centers based on the actual product received.
      • Drilling: Drill vertically. Clear dust and insert expansion anchors.
      • Fixing: Align the plate and drive screws. Fine-tune for levelness before tightening.
      • Sealing: Use sealant in wet areas (kitchen/bath) or shims for uneven surfaces.
      • Testing: Shake manually to ensure zero movement before loading weight.

      V. Common Mistakes to Avoid

      ❌ Mounting on hollow walls / gypsum boards
      ✅ Solution: Must use reinforcement studs or back-boards first.
      ❌ Ignoring leveling (visual estimation)
      ✅ Solution: Always use a spirit level to prevent uneven stress.
      ❌ No expansion gap in humid areas
      ✅ Solution: Leave 6mm gap to prevent thermal expansion warping.
      Installation Tips

      Installing ChandelierTips: A Complete Guide by Metavaya

      Chandeliers are a timeless addition to any home, offering both style and function. Whether installed above a kitchen island, a dining table, or in a hallway, Chandelier can transform your space. At Metavaya, we want you to feel confident throughout the installation process. Follow our step-by-step guide, and you’ll soon enjoy a beautifully illuminated room!

      Step 1: Preparation
      Before starting, ensure you have all the tools and follow safety protocols.

      Tools You’ll Need:
      Ladder, pliers, wire strippers, screwdrivers, power drill(optional), a drill bit(optional)


      Safety First:
      Turn Off Power: Shut off power at the breaker panel for the room you’re working in.
      Test for Power: Use a voltage tester on the wires or fixture to confirm no current is flowing.
      Remove the Old Fixture: Carefully unscrew and disconnect the existing light. Retain screws or mounting hardware, as they may be helpful for the new fixture.

      how to install chandelier - turn off the power | Sofary
      Step 2: Assemble the Chandelier
      Lay out all parts and assemble your fixture according to the manufacturer’s instructions.

      Organize Components: Spread all parts on a flat surface for easy access.
      Pre-Assemble Parts: Attach rods, chains, or decorative elements, and set the hanging height to your preference.
      Secure Decorations: Attach shades, crystals, or other decorative elements while on the ground to simplify installation.
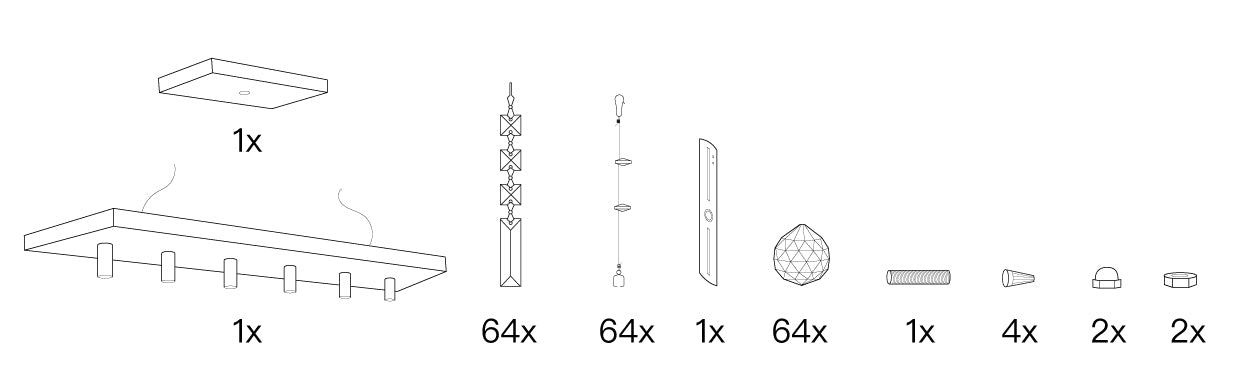
      How To Install Chandelier- Product Accessories | Sofary
      Step 3: Install the Mounting Bracket
      The mounting bracket is vital for a stable and secure fixture.

      Attach the Bracket: Secure it to the ceiling junction box using screws provided.
      Check Stability: Gently pull on the bracket to ensure it’s firmly in place. For heavier fixtures, use a fan brace or additional support.
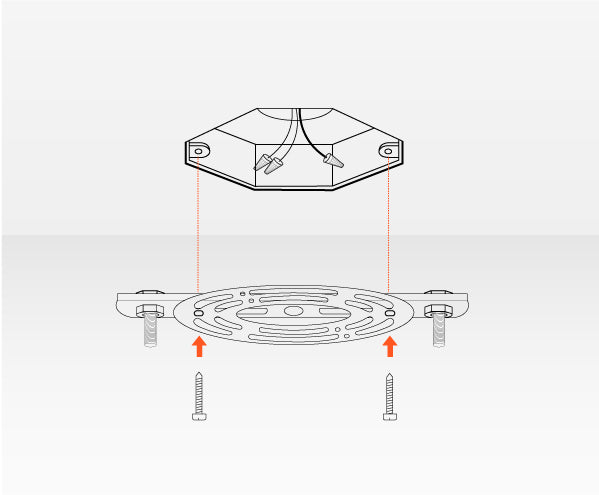
      How To Install Chandelier- install the mounting bracket | Sofary
      Step 4: Connect the Wiring
      Wiring is a crucial step—take care to follow these guidelines:

      Identify Wires:

      Black: Live/hot wire
      White: Neutral wire
      Green/Bare Copper: Ground wire
      Wiring Instructions:

      Ground Wire: Connect the pendant’s ground wire to the junction box’s ground wire and secure with a connector.
      Neutral Wires: Twist the white wires together and secure with a wire connector.
      Live Wires: Connect the black wires and secure them.
      Double-Check Connections: Tug each connection gently to ensure they are secure and no bare wires are exposed.

      Tip: If you’re unsure about wiring, consult a licensed electrician.
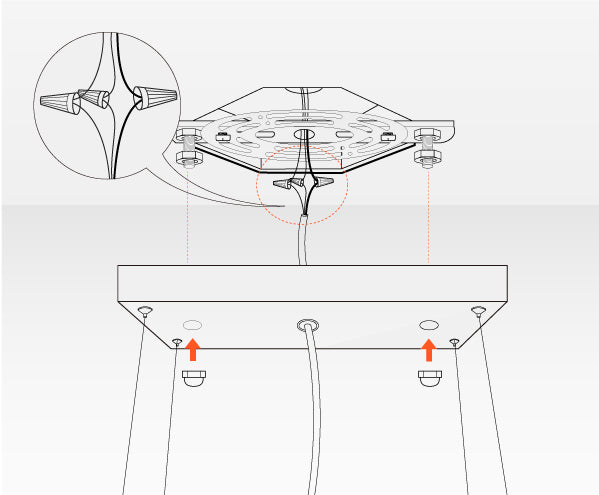
      如何安装吊灯-安装安装支架 | Sofary

      Step 5: Attach the Chandelier
      Mount your fixture onto the bracket.

      Secure the Fixture: Align the pendant with the mounting bracket and use screws or nuts to fasten it.
      Adjust Alignment: Check that the pendant hangs level and at the correct height before tightening fully.
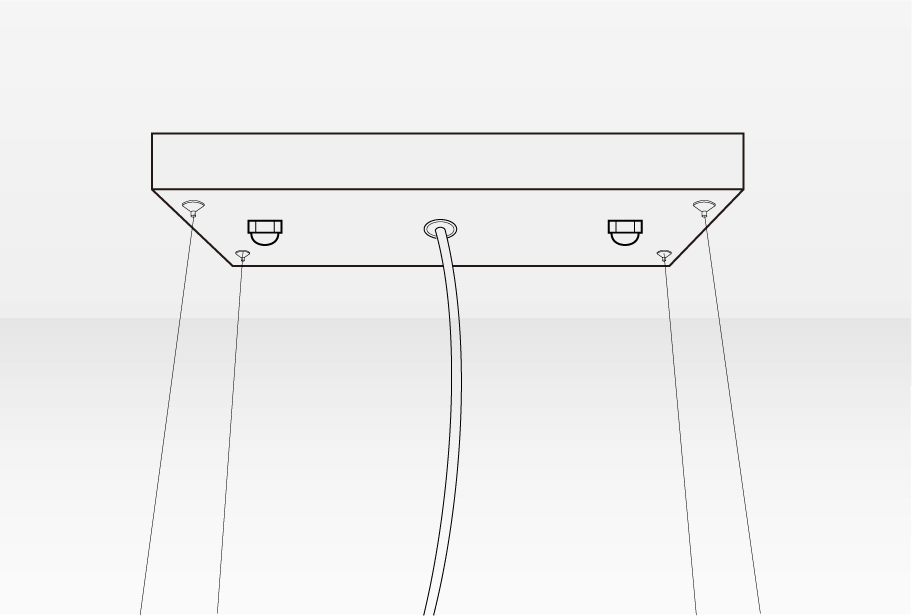
      如何安装吊灯 - 连接电线并安装顶篷 | Sofary
      Step 6: Finalize Setup
      Add the finishing touches to your fixture.

      Insert Bulbs: Use the recommended wattage and type for your Chandelier.
      Attach Shades or Covers: Secure any shades or covers not attached earlier.
      Stability Check: Ensure all components are secure and the fixture hangs level.
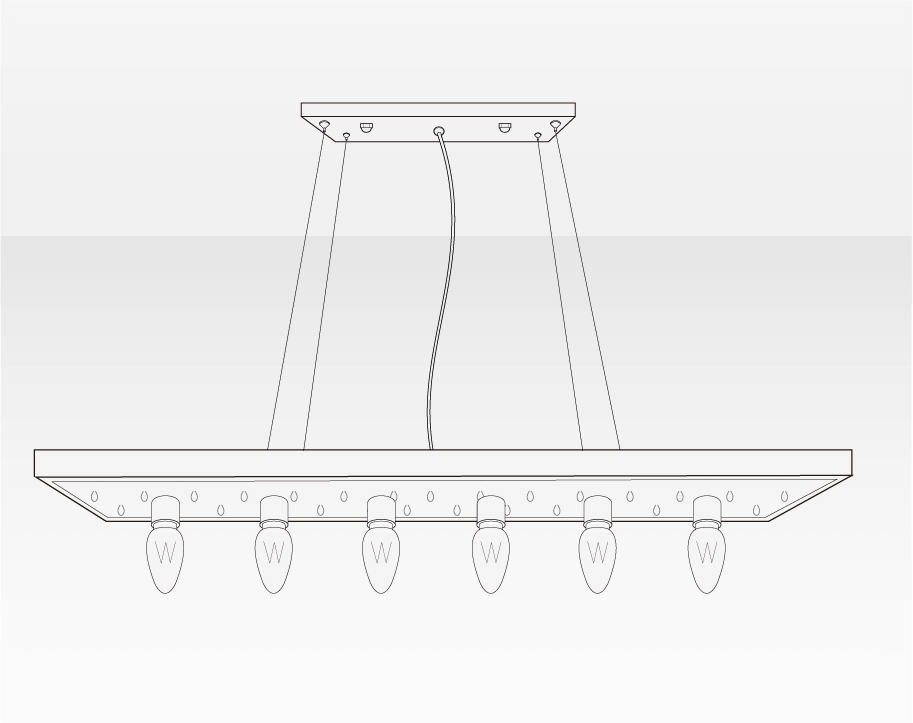
      如何安装吊灯 - 安装灯泡 | Sofary
      Step 7: Test Your Light
      Restore power and enjoy your new lighting!

      Restore Power: Switch the breaker back on.
      Flip the Switch: Turn on the Chandelier to check functionality.
      Make Final Adjustments: Step back to assess height and alignment, and make any necessary tweaks.

      Additional Tips for Chandelier Installation
      Optimal Heights:

      • Kitchen Island/Countertop: 30–36 inches above the surface.


      • Dining Table: 30–34 inches from the table to the fixture bottom.


      • Hallways/Open Spaces: Maintain at least 7.5 feet of clearance from the floor.


      Support for Heavy Fixtures:
      Ensure your ceiling junction box and bracket can support the pendant’s weight. For heavy fixtures, use additional reinforcement like a fan brace.

      Professional Assistance:
      If you’re unsure about wiring or want to ensure compliance with building codes, hire a licensed electrician for peace of mind.

      Step 8: Check

      Congratulation, you have completed the installation for your chandelier! One last thing to do is to check it from a distant just to make sure that the chandelier is leveled and at proper height. Make additional small adjustment as needed. After ensuring safety, you can turn on your house’s power switch and the light switch for the chandelier. Now you can enjoy the beautiful chandelier that you just installed for your home. 

      We hope this blog will be able to provide you an overall view about the chandelier’s installation process as well as step by step guidance when you are doing the installation. If you have any questions, feel free to contact us and we are always here to help! 

      Duties & Taxes

      Customs, Duties, and Taxes


      Please be aware that all prices shown on our website do not include duties, local taxes, or any other import charges. In most cases, our parcels pass through customs without VAT being charged. However, for larger orders or certain circumstances, we may need to provide additional information to customs and cooperate with the buyer to supply the required paperwork.

      Each destination country has its own import tax threshold, which determines the value of goods that can be imported before import duties are charged. Import duties, taxes, and other charges are not included in the item price or shipping cost. These charges are the buyer’s responsibility, and we are not liable for any delays caused by customs authorities in your country.

      For more details regarding applicable fees, we recommend contacting your local customs office.

      FAQs

      Q: I have high ceilings? Can I customize the length of the pole or the length of the wire?
      Q: Can I install a fixture on a sloped ceiling?
      Q: Are your products UL listed?
      Q: If l receive a broken product, what should l do?
      Q: How to Care for Your Lighting Products?

      We Promise!

      Latest News