Buying Guide · Finishes & Materials
A lighting finish is the one decision in a room that touches every...

06
Oct


Guarantee safe & secure checkout





Fabric pendant · Dual-layer
A drum within a drum. The bulbs sit inside the inner shade, so every bit of light reaching the room has already passed through two layers of high-translucency woven fabric — diffused once, then again. Glow instead of glare, and a depth that a single shade flattens out.

The details
Inches and centimetres throughout, so nothing has to be converted before you measure the ceiling.
50 / 70 cm · small and large.
49 / 67 cm · excluding the cord.
150 cm · shorten at install, lengthen on request.
Four sockets, 15W each · AC 110–240V, no driver needed.
Two states
Switched off in daylight it is a calm beige cylinder with a dark ring set into its underside — a form, not a fixture. After dark the two layers separate, and the gap between them becomes the brightest line on the piece.


Switched off
A calm beige cylinder with a dark ring set into its underside. Two rings and a shadow gap, reading as a form rather than a fixture — which is what lets it sit in a room that is already finished.
Switched on
The two layers separate. The outer veil turns honey, the gap between them becomes the brightest line on the piece, and the weave comes forward as texture you can see from the table.
The pendant switches itself on and off. Use the switch to hold it either way, or rest the pointer on the image.
The idea
The drum pendant is the most ordinary silhouette in lighting. Concentric Veil keeps the outline and rebuilds the inside, so there is something to look at whether the switch is up or down.
The inner shade carries the sockets, the outer veil carries the glow. Between them sits a shadow gap that gives the fixture depth from across the room.
High-translucency textile with a natural woven grain. Lit from inside, the weave reads as fine texture across the surface rather than a flat panel of white.
The inner layer keeps all four bulbs from view at standing height. Soft light falls to the table below; the rest spreads through the sides as ambient wash.
Each shade is wrapped and trimmed by hand over a black metal frame. The seam, the top ring and the edge binding are finished by a person, not stamped.
Anatomy

01
Both drums are wrapped in the same linen and closed with a folded, hand-bound edge. From underneath you read the whole construction at once — the outer rim, the air gap, and the inner shade’s edge sitting inside it.

02
A black steel hub carries four E26 / E27 holders on thin wire arms, suspended inside the inner shade. Max 15W a socket. All four sit above the inner drum’s opening, so no filament is ever in your eye line.

03
Braided fabric cord, not a plastic sleeve, clamped in a machined matte-black grip with a knurled collar and a set screw. That screw is what holds your drop: set the height once and the cord will not creep.

04
∅ 50 cm and ∅ 70 cm next to each other. Same linen, same bound edge, same cord and grip assembly — the only thing that changes is the diameter.
The light path
A cross-section through the middle of the fixture. Two layers, one air gap, and nothing in the room you have to squint past.
01
Four bulbs on one spider, 15W maximum each, sit inside the inner shade — never in open view.
02
The inner fabric evens out the filament. What leaves it is already soft, with no bright point left to throw a hard edge.
03
Light fills the cavity between the two layers and lifts the outer veil to an even brightness, edge to edge.
04
A warm pool lands on the table below. The rest leaves through the sides as a wide, low-contrast wash across the room.
Sizing
Drawn to scale against the table each one is meant for, at the hanging height we recommend. The small one works in multiples and in tight rooms; the large one works alone, over something worth centring on.
Small
Entryways, breakfast nooks, bedside in a pair, and round tables up to about 90 cm / 35″. Two or three in a row suit a standard kitchen island.
Large
Dining tables of 120–180 cm / 47–71″ as a single pendant, living rooms, open-plan spaces and stairwell drops with height to spare.
Both scenes are drawn to the same scale, against a 2.5 m ceiling and a 75 cm table height.
In the room


For comparison
Same wall, same bulb, same distance. The difference is what the shade does with it.
Concentric Veil— two layers
No bright point anywhere. The veil holds one even value from edge to edge, and the light lands as a soft pool.
Typical drum— one layer
The bulb sits in the open base. It is the brightest thing in the room, and the edge of the light is hard.
| Concentric Veil | Typical single-layer drum | |
|---|---|---|
| Shade structure | Two concentric fabric shades with an air gap | One shade, often with an open or louvred base |
| Bulbs in view | All four hidden inside the inner shade | Visible from below, and often from the side |
| Surface when lit | Even across the whole veil, weave still readable | Brighter where the bulb sits, flatter elsewhere |
| When switched off | Two rings and a shadow gap — still has depth | A plain cylinder |
| Light distribution | Pool below plus wide ambient wash through the sides | Mostly downward, with a harder edge |
| Construction | Hand-wrapped fabric over a metal frame | Machine-assembled, bonded shade |
Made to fit
Every fixture ships with 150 cm / 59″ of cord, which an electrician can shorten anywhere on site. If you need it longer — a stairwell, a double-height room, a vaulted ceiling — message us with the ceiling height and the drop you want before you order, and we will prepare it for you.
Write to us about sizing, drop length or a room you are unsure about, and you will hear back within a day.
Slight variation in the weave and in the beige tone is part of the material, not a fault.
AC 110–240V and an E26 / E27 socket, so the fixture is at home wherever it lands.
Sloped ceilings
The canopy in the box is a sloped-ceiling canopy. It tilts to sit flush against the pitch while the cord drops plumb, so the drum hangs level whatever the ceiling is doing above it. Nothing to order separately.
01
The sloped canopy ships with every fixture, in the same box. There is no adapter to buy and no part number to look up.
02
The cord pivots where it leaves the canopy, so the drum reads horizontal from every seat at the table — the thing that goes wrong when a flat canopy is forced onto a pitch.
03
On a slope the drop is measured straight down from the ceiling where the fixture mounts, not from the low wall. Keep 2.1 m / 6′10″ clear under the shade wherever people walk.
Questions
As a rule, the pendant should measure about one half to one third of the table it hangs over. The 50 cm size suits round tables up to 90 cm / 35″, entryways and bedsides, and works in rows of two or three over an island. The 70 cm size is for dining tables of 120–180 cm / 47–71″ and larger open rooms.
Over a table, 75–90 cm / 30–35″ from the tabletop to the bottom edge of the shade. Anywhere people walk, keep the bottom edge at least 2.1 m / 6′10″ off the floor.
We provide 150 cm / 59″ wires, which can be lengthened as needed — contact us before you order with your ceiling height and the drop you want.
Whether it supports dimming depends on what type of bulb you buy. If you buy a dimming bulb, this lamp will achieve a dimming function. The bulb provided by default does not support dimming.
The fixture itself is controlled by a push button switch.
Four 2700K warm white LEDs, 8–12W each, with E26 or E27 bases. Fifteen watts is the maximum per socket. We would avoid 4000K and cooler, which drains the warmth out of the beige fabric.
Not at standing height — the inner shade covers the whole cluster. Sitting directly beneath and looking straight up, you see the lit inner shade rather than the filaments themselves.
Yes. A sloped-ceiling canopy comes with every fixture, so the canopy sits flush against the pitch while the cord drops plumb and the shade hangs level. Nothing extra to order.
It mounts to the ceiling like any corded pendant, with a canopy covering the outlet. The fixture is light and no separate driver is required. We recommend a qualified electrician, as wiring standards differ by country.
Dust it with a soft dry brush, or the brush head of a vacuum on low suction, working around the drum rather than across it. Do not use water, solvents or any wet cloth on the textile.
Close, but not identical. The shades are made from natural woven textile and finished by hand, so the tone and the grain vary a little from piece to piece, and screens render beige differently.
Thank you for your purchase. We hope you are happy with your purchase. However, if you are not completely satisfied with your purchase for any reason, you may return it to us for [a full refund], or [an exchange]. Please see below for more information on our return policy. Please see below for more information on our return policy.
RETURNS
All returns must be made within [30] days of the delivered date. All returned items must be in new and unused condition, with all original tags and labels attached.
RETURN PROCESS
To return an item, please email customer service at support@metavaya.com to obtain a Return Merchandise Authorization. place the item securely in its original packaging, and mail your return to our warehouse.
Please note, you will be responsible for all return shipping charges.
REFUNDS
After receiving your return and inspecting the condition of your item, we will process your [return] or [exchange]. Please allow at least [7] days from the receipt of your item to process your [return] or [exchange]. Refunds may take 1-2 billing cycles to appear on your credit card statement, depending on your credit card company. We will notify you by email when your return has been processed.
EXCEPTIONS
The following items cannot be [returned] or [exchanged]:
For defective or damaged products, please contact us at the contact details below to arrange a refund or exchange.
Please Note:Sale items are FINAL SALE and cannot be returned.
If you have any questions concerning our return policy, please contact us at: support@metavaya.com
At Metavaya, we provide comprehensive customization services to ensure your lighting perfectly fits your space and style. Whether you prefer modern minimalism, industrial chic, or timeless elegance, we are here to craft unique lighting fixtures that bring out the best in your space.
Start by connecting with our experts via live chat or email and share the following details:
We’re here to help you every step of the way!
Q: How much does custom lighting cost?
A: Pricing depends on the complexity of the design, materials, and dimensions. Contact us for a personalized quote.
Q: What is the production and delivery time?
A: It typically takes 4 to 7 weeks, depending on the order's complexity.
Q: Do you offer global shipping?
A: Yes, we provide worldwide shipping, with fees calculated based on destination and order size.
Contact us today to begin creating your bespoke lighting fixture, and let Metavaya illuminate your space with brilliance and style!

Important Note: The features described below apply generally to our lighting fixtures. They do not guarantee that the specific product you are viewing includes these features. Please refer to the Description section of the product page to verify its functionalities.
Dimmable Version:
Three-Color Switch-Controlled Version:
Color temperature defines the visual tone of light, influencing the ambiance and functionality of your space. Here's a guide to help you choose:
Warm White (2700-3300K):
Provides a soft, inviting glow, ideal for creating cozy and relaxing atmospheres in living rooms, bedrooms, and dining areas.
Neutral Light (3300-5300K):
Offers bright, balanced illumination similar to natural daylight. Perfect for kitchens, bathrooms, offices, and retail spaces where clarity and focus are key.
Cool White (5300-6500K):
Produces a crisp, energizing light, enhancing focus and productivity. Best suited for task-oriented spaces such as workshops, garages, and display areas.
Tip: Select the color temperature based on the activities and mood you want to establish in your space to ensure both functional and aesthetic harmony.
Install on solid brick or concrete. NO hollow bricks or gypsum boards. Ensure wall flatness within 0.5mm error.
Confirm bracket hole positions before drilling. Sizes vary by fixture. Each ceiling plate requires specific measurement for alignment.
Standard Duty: ≤15kg. Heavy Duty: 30-50kg. Fix every 40-50cm. Double-person install required for large appliances.


Chandeliers are a timeless addition to any home, offering both style and function. Whether installed above a kitchen island, a dining table, or in a hallway, Chandelier can transform your space. At Metavaya, we want you to feel confident throughout the installation process. Follow our step-by-step guide, and you’ll soon enjoy a beautifully illuminated room!
Step 1: Preparation
Before starting, ensure you have all the tools and follow safety protocols.
Tools You’ll Need:
Ladder, pliers, wire strippers, screwdrivers, power drill(optional), a drill bit(optional)

Safety First:
Turn Off Power: Shut off power at the breaker panel for the room you’re working in.
Test for Power: Use a voltage tester on the wires or fixture to confirm no current is flowing.
Remove the Old Fixture: Carefully unscrew and disconnect the existing light. Retain screws or mounting hardware, as they may be helpful for the new fixture.

Step 2: Assemble the Chandelier
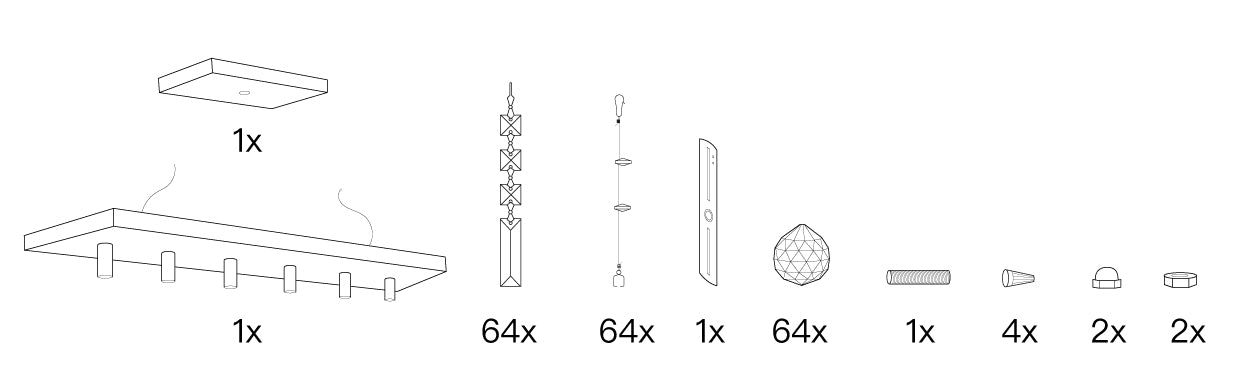
Lay out all parts and assemble your fixture according to the manufacturer’s instructions.
Organize Components: Spread all parts on a flat surface for easy access.
Pre-Assemble Parts: Attach rods, chains, or decorative elements, and set the hanging height to your preference.
Secure Decorations: Attach shades, crystals, or other decorative elements while on the ground to simplify installation.
Step 3: Install the Mounting Bracket
The mounting bracket is vital for a stable and secure fixture.
Attach the Bracket: Secure it to the ceiling junction box using screws provided.
Check Stability: Gently pull on the bracket to ensure it’s firmly in place. For heavier fixtures, use a fan brace or additional support.
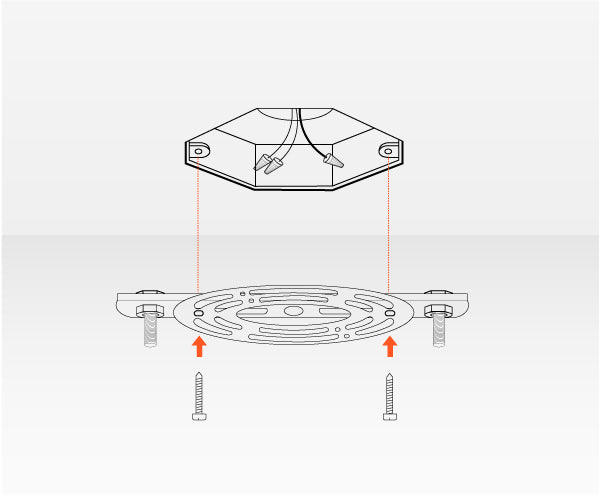
Step 4: Connect the Wiring
Wiring is a crucial step—take care to follow these guidelines:
Identify Wires:
Black: Live/hot wire
White: Neutral wire
Green/Bare Copper: Ground wire
Wiring Instructions:
Ground Wire: Connect the pendant’s ground wire to the junction box’s ground wire and secure with a connector.
Neutral Wires: Twist the white wires together and secure with a wire connector.
Live Wires: Connect the black wires and secure them.
Double-Check Connections: Tug each connection gently to ensure they are secure and no bare wires are exposed.
Tip: If you’re unsure about wiring, consult a licensed electrician.
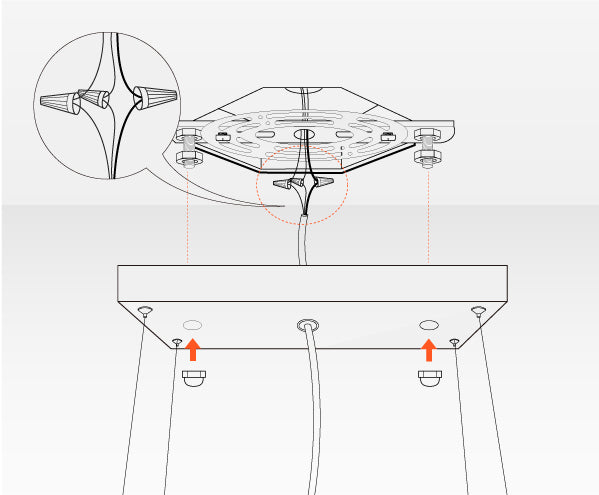
Step 5: Attach the Chandelier
Mount your fixture onto the bracket.
Secure the Fixture: Align the pendant with the mounting bracket and use screws or nuts to fasten it.
Adjust Alignment: Check that the pendant hangs level and at the correct height before tightening fully.
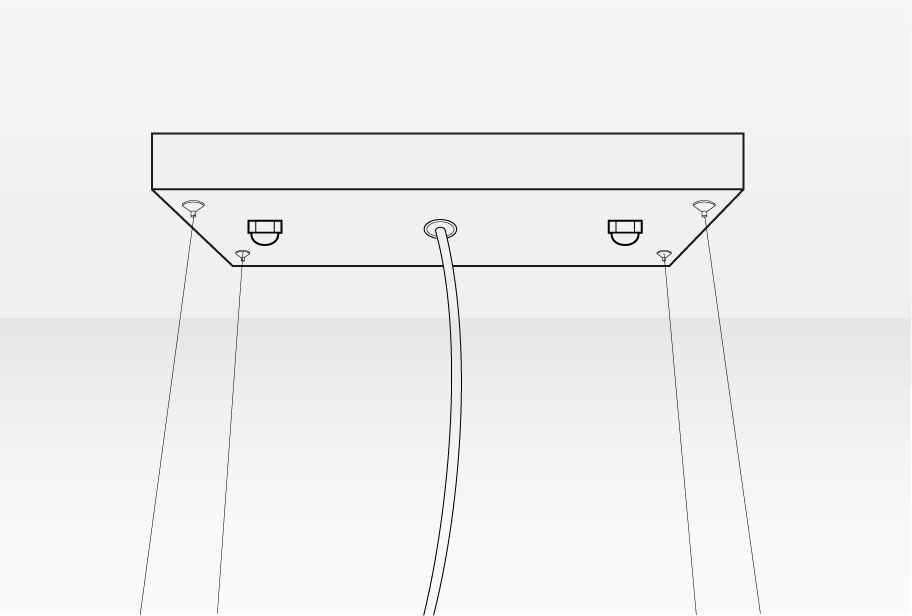
Step 6: Finalize Setup
Add the finishing touches to your fixture.
Insert Bulbs: Use the recommended wattage and type for your Chandelier.
Attach Shades or Covers: Secure any shades or covers not attached earlier.
Stability Check: Ensure all components are secure and the fixture hangs level.
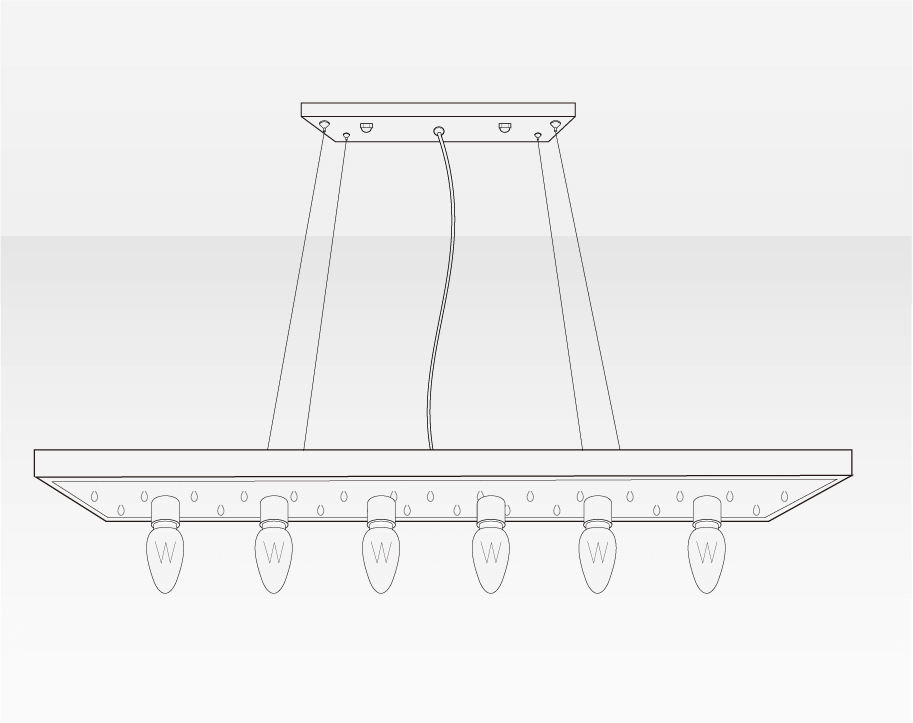
Step 7: Test Your Light
Restore power and enjoy your new lighting!
Restore Power: Switch the breaker back on.
Flip the Switch: Turn on the Chandelier to check functionality.
Make Final Adjustments: Step back to assess height and alignment, and make any necessary tweaks.
Additional Tips for Chandelier Installation
Optimal Heights:


Support for Heavy Fixtures:
Ensure your ceiling junction box and bracket can support the pendant’s weight. For heavy fixtures, use additional reinforcement like a fan brace.
Professional Assistance:
If you’re unsure about wiring or want to ensure compliance with building codes, hire a licensed electrician for peace of mind.
Step 8: Check
Congratulation, you have completed the installation for your chandelier! One last thing to do is to check it from a distant just to make sure that the chandelier is leveled and at proper height. Make additional small adjustment as needed. After ensuring safety, you can turn on your house’s power switch and the light switch for the chandelier. Now you can enjoy the beautiful chandelier that you just installed for your home.
We hope this blog will be able to provide you an overall view about the chandelier’s installation process as well as step by step guidance when you are doing the installation. If you have any questions, feel free to contact us and we are always here to help!
Please be aware that all prices shown on our website do not include duties, local taxes, or any other import charges. In most cases, our parcels pass through customs without VAT being charged. However, for larger orders or certain circumstances, we may need to provide additional information to customs and cooperate with the buyer to supply the required paperwork.
Each destination country has its own import tax threshold, which determines the value of goods that can be imported before import duties are charged. Import duties, taxes, and other charges are not included in the item price or shipping cost. These charges are the buyer’s responsibility, and we are not liable for any delays caused by customs authorities in your country.
For more details regarding applicable fees, we recommend contacting your local customs office.


Experience the artistry of handcrafted Italian glass with the Florence Collection. Discover how sculptural chandeliers and sconces transform lighting into fine art.