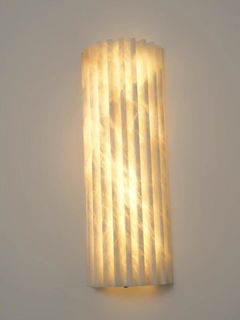
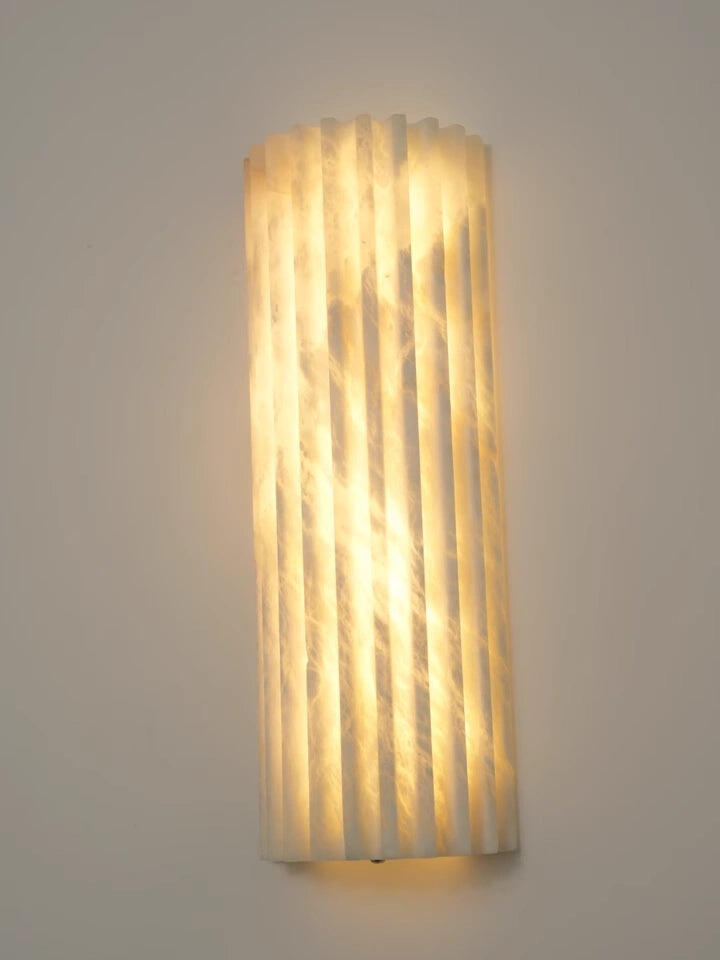
Ondine Wave Glass Wall Sconce featuring layered amber glass strips with curved edges, glowing against a clean white wall.
Warm amber wave glass wall sconce mounted beside a wooden bed and bedside table in a cozy neutral bedroom.
Green textured glass wall sconce glowing above a wooden console with decorative vases and leafy plants.
Olive green wave glass wall light illuminating a calm bedroom with a cream upholstered bed and wooden nightstand.
Clear tiered glass wall sconce mounted above a dark gray armchair beside a bright window in a reading nook.
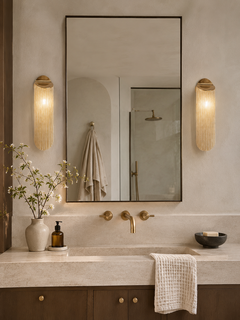
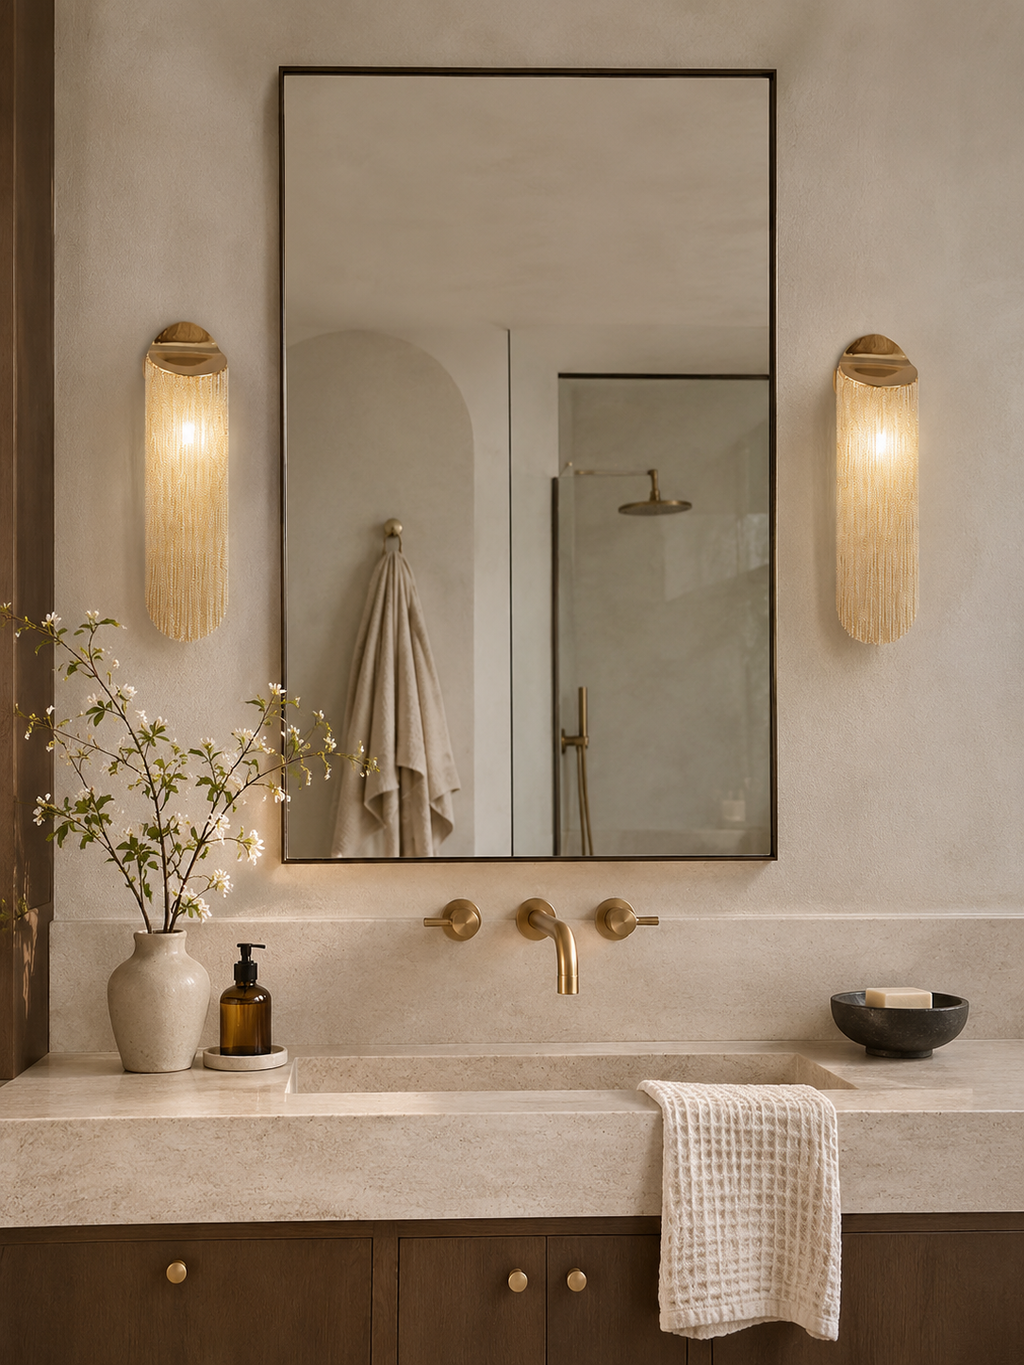
Amber glass wall sconce providing warm accent lighting beside an arched bathroom mirror and brass faucet.
Amber wave glass wall sconce above an ornate wooden console beside a gilded mirror in an elegant entryway.
Smoke gray glass wall sconce illuminating a traditional living room wall above a carved wooden sideboard.
Clear wave glass wall sconce adding a soft glow to a classic hallway with arched doorways and a long runner rug.
Clear textured glass wall sconce mounted beside a vintage wooden four-poster bed and bedside chest.
Smoke gray wave glass wall light glowing above a wooden headboard in a modern bedroom with dark paneled walls.
Illuminated smoke gray glass wall sconce showing three stepped layers of thick curved glass against a concrete wall.
Angled view of an illuminated smoke gray wave glass sconce with rounded glass edges and a sculptural profile.
Clear wave glass wall sconce illuminated against a textured gray wall, revealing overlapping glass strips and warm bulbs.
Clear textured glass wall sconce with layered curved panels shown against a gray wall in an unlit appearance.
Illuminated green wave glass wall sconce with three layered tiers and warm light filtering through olive glass.
Olive green textured glass wall sconce shown at a slight angle with softly glowing internal bulbs.
Amber wave glass wall sconce glowing warmly against a concrete wall with curved overlapping glass strips.
Angled close view of the amber glass wall light highlighting its rounded three-tier silhouette and golden reflections.
Macro close-up of clear rippled glass strips revealing thick rounded edges and irregular translucent texture.
Side close-up of layered clear glass panels showing the flowing wave shape and overlapping construction.

مصباح جداري زجاجي على شكل موجة أوندين

رمز المنتج: M202611083-1
التوفر: في الأوراق المالية النظام السابق إنتهى من المخزن
Free shipping and customs duties for US customers
$447.00 $298.00

المقاس: ∅ 10.2″ x ارتفاع 10.2″

∅ 10.2″ x ارتفاع 10.2″

اللون: شفاف + ذهبي

شفاف + ذهبي
شفاف + أسود
رمادي دخاني + ذهبي
رمادي دخاني + أسود
أخضر + ذهبي
أخضر + أسود
كهرماني + ذهبي
كهرماني + أسود

نضمن لك عملية دفع آمنة ومضمونة

ميتافايا · عرض لفترة محدودة

أسود جمعة أُوكَازيُون

أنفق أكثر، ووفر أكثر — خصم يصل إلى 20%

انقر على رمز الخصم لنسخه · استخدمه عند الدفع

الإرجاع والاستبدال

شكراً لشرائك. نأمل أن تكون سعيداً بما اشتريته. ومع ذلك، إذا لم تكن راضياً تماماً عن عملية الشراء لأي سبب من الأسباب، يمكنك إعادتها إلينا لاسترداد [مبلغ الشراء بالكامل]، أو [للاستبدال]. يرجى الاطلاع أدناه للحصول على مزيد من المعلومات حول سياسة الإرجاع الخاصة بنا. يرجى الاطلاع أدناه للحصول على مزيد من المعلومات حول سياسة الإرجاع الخاصة بنا.

الإرجاع

يجب إتمام جميع عمليات الإرجاع في غضون [30] يوماً من تاريخ التسليم. يجب أن تكون جميع العناصر المرتجعة في حالة جديدة وغير مستخدمة، مع إرفاق جميع البطاقات والملصقات الأصلية.

عملية الإرجاع

لإرجاع عنصر ما، يرجى مراسلة خدمة العملاء عبر البريد الإلكتروني support@metavaya.com للحصول على تصريح إرجاع البضائع. ضع العنصر بأمان في عبوته الأصلية، وأرسل مرتجعاتك بالبريد إلى مستودعنا.
يرجى ملاحظة أنك ستكون مسؤولاً عن جميع رسوم شحن الإرجاع.

المبالغ المستردة

بعد استلام مرتجعاتك وفحص حالة العنصر، سنقوم بمعالجة [الإرجاع] أو [الاستبدال] الخاص بك. يرجى السماح بـ [7] أيام على الأقل من استلام العنصر الخاص بك لمعالجة [الإرجاع] أو [الاستبدال]. قد تستغرق المبالغ المستردة من دورة إلى دورتين للفواتير لتظهر في كشف حساب بطاقتك الائتمانية، اعتماداً على شركة بطاقتك الائتمانية. سنخطرك عبر البريد الإلكتروني عند معالجة إرجاعك.

الاستثناءات

لا يمكن [إرجاع] أو [استبدال] العناصر التالية:

  • المصابيح التي تم تركيبها واستخدامها أو في حال تضرر التركيب
  • المنتجات الهشة التي تضررت أثناء النقل (الزجاج، الخشب، الورق)، يمكن إعادة إرسالها مجاناً
  • المنتجات المخصصة

بالنسبة للمنتجات المعيبة أو التالفة، يرجى الاتصال بنا عبر تفاصيل الاتصال أدناه لترتيب استرداد المبلغ أو الاستبدال.
يرجى ملاحظة: عناصر التخفيضات هي مبيعات نهائية ولا يمكن إرجاعها.

إذا كانت لديك أي أسئلة تتعلق بسياسة الإرجاع الخاصة بنا، يرجى الاتصال بنا على: support@metavaya.com

خدمة تخصيص الإضاءة

التخصيص


خصص حل الإضاءة الخاص بك | خدمات Metavaya المصممة خصيصاً

اصنع إضاءتك الفريدة

في Metavaya، نقدم خدمات تخصيص شاملة لضمان توافق الإضاءة تماماً مع مساحتك وأسلوبك. سواء كنت تفضل البساطة العصرية، أو الطراز الصناعي الأنيق، أو الأناقة الخالدة، فنحن هنا لنصنع لك وحدات إضاءة فريدة تبرز جمال مساحتك.


عملية التخصيص

1. فهم احتياجاتك

ابدأ بالتواصل مع خبرائنا عبر الدردشة المباشرة أو البريد الإلكتروني وشاركنا التفاصيل التالية:

  • نمط التصميم: اختر من بين مجموعة متنوعة من الأنماط، بما في ذلك الحديث، والكلاسيكي، والبسيط.
  • المواد واللون: اختر مواد مثل المعدن أو الزجاج، وحدد اللمسة النهائية التي تكمل ديكور مساحتك.
  • الحجم والشكل: قم بتخصيص الأبعاد والشكل لتناسب غرفتك تماماً.
  • الميزات الوظيفية: أضف إمكانيات التحكم في شدة الإضاءة (تعتيم)، وخصص لون الإضاءة، والمزيد.

2. تأكيد تصميمك

  • رسومات التصميم ببرنامج CAD: احصل على رسومات تصميم احترافية لتصور وحدتك بدقة.
  • التصميم ثلاثي الأبعاد (3D): عاين الوحدة في مساحتك باستخدام نماذج ثلاثية الأبعاد مفصلة، مما يسمح بإجراء تعديلات حتى تصل للنتيجة المثالية.

3. الإنتاج والتسليم

  • حرفية ماهرة: بمجرد الانتهاء من التصميم، يقوم حرفيون لدينا بصناعة وحدة الإضاءة بعناية فائقة واهتمام دقيق بالتفاصيل.
  • التسليم في الوقت المحدد: نقوم بتسليم المنتج النهائي كما وعدنا، مع إرشادات تركيب واضحة لجعل العملية سلسة.

اتصل بنا

نحن هنا لمساعدتك في كل خطوة على الطريق!

  • الدردشة المباشرة: أيام العمل من 8:00 صباحاً حتى 10:00 مساءً، وفي عطلة نهاية الأسبوع من 8:00 صباحاً حتى 6:00 مساءً. تحدث مع خبرائنا مباشرة للحصول على مشورة مخصصة.
  • البريد الإلكتروني: تواصل معنا عبر support@metavaya.com، وسنرد عليك خلال 24 ساعة.
  • استشارة هاتفية: اتصل بنا على +86 181 9024 2203 لمناقشة متطلباتك مع فريق التصميم لدينا.

    الأسئلة الشائعة

    • س: كم تكلفة الإضاءة المخصصة؟
      ج: يعتمد التسعير على تعقيد التصميم، والمواد، والأبعاد. اتصل بنا للحصول على عرض سعر مخصص.

    • س: ما هي مدة الإنتاج والتسليم؟
      ج: تستغرق العملية عادةً من 4 إلى 7 أسابيع، اعتماداً على تعقيد الطلب.

    • س: هل تقدمون خدمة الشحن الدولي؟
      ج: نعم، نحن نقدم خدمة الشحن إلى جميع أنحاء العالم، ويتم حساب الرسوم بناءً على الوجهة وحجم الطلب.


    ابدأ رحلة الإضاءة المخصصة الخاصة بك

    تواصل معنا اليوم للبدء في ابتكار وحدة الإضاءة الخاصة بك، ودع Metavaya تضيء مساحتك بروعة وأناقة!

    دليل مقاسات وتركيب الإضاءة

    كيفية اختيار الحجم المثالي لوحدات الإضاءة لأي غرفة

    يعد اختيار الحجم المناسب لوحدة الإضاءة أمراً أساسياً لتحقيق التوازن بين الإضاءة الوظيفية والجمالية. فالوحدة صغيرة الحجم قد تبدو غير مناسبة، بينما الكبيرة جداً قد تطغى على المساحة. استخدم الإرشادات والنصائح التالية للعثور على الحجم المثالي لوحدة الإضاءة في غرفتك.


    إرشادات عامة لتحديد أحجام وحدات الإضاءة

    1. حساب القطر

    استخدم هذه المعادلة البسيطة لتحديد القطر المثالي لوحدة الإضاءة الخاصة بك:

    • قس **طول** و**عرض** الغرفة (بالقدم).
    • اجمع القياسين معاً.
    • حوّل المجموع إلى بوصات لتحديد القطر الموصى به للوحدة.

    مثال: 18 قدماً (طول الغرفة) + 12 قدماً (عرض الغرفة) = 30 قدماً؛ يجب أن يكون قطر الثريا حوالي 30 بوصة.

    2. كيفية تحديد ارتفاع الثريا

    للعثور على الارتفاع المثالي للوحدة:

      قس المسافة بين الأرضية والسقف بالقدم، واضرب الناتج في 2.5 للحصول على الارتفاع التقريبي للثريا بالبوصة. تنطبق هذه القاعدة بشكل أساسي على الثريات المتدلية وليس بالضرورة على ثريات السقف.

      مثال: على سبيل المثال، إذا كان ارتفاع الغرفة 10 أقدام، فإن 10 × 2.5 = 25؛ يجب أن يكون ارتفاع الثريا حوالي 25 بوصة.

      3. كيفية تحديد الارتفاع المناسب لتعليق الثريا

      إذا كنت تعلق الثريا في مساحة مفتوحة، يجب أن يكون قاع الثريا على ارتفاع لا يقل عن 7.5 قدم من الأرضية.

      إذا كنت تعلق الثريا فوق طاولة طعام أو جزيرة مطبخ، يجب أن يكون قاع الثريا على بعد 30 إلى 36 بوصة من سطح الطاولة.

      قواعد ونصائح أخرى تنطبق على مساحات مختلفة.

      إلى جانب القواعد العامة التي تنطبق على معظم المساحات، هناك قواعد ونصائح أخرى لمناطق مختلفة، مثل حجم الثريا المناسب لغرفة الطعام أو المداخل (الفوييه).

      غرفة الطعام وجزيرة المطبخ

      إذا كنت تعلق الثريا فوق طاولة الطعام أو جزيرة المطبخ، يمكنك أيضاً تحديد الحجم بناءً على طول الطاولة أو الجزيرة. نوصي عموماً بأن يكون طول الثريا أو قطرها ما بين 1/2 إلى 3/4 طول طاولة الطعام أو جزيرة المطبخ.

      على سبيل المثال، لنفترض أن طول طاولة الطعام 60 بوصة. يجب أن يتراوح قطر أو طول الثريا بين 30 (60 × 1/2) إلى 45 (60 × 3/4) بوصة.

      المدخل المكون من طابقين مع درج

      إلى جانب القاعدة العامة بضرورة وجود مسافة لا تقل عن 7 أقدام ونصف بين قاع الثريا والأرضية، بالنسبة للمساحات المكونة من طابقين، يجب أيضاً مراعاة كيف ستبدو من الطابق الثاني. بشكل عام، تعد ثريات الدرج خياراً جيداً. وفيما يتعلق بالوضع، إليك إرشادات شائعة:

      • الإرشادات العامة هي استخدام الطابق الثاني كنقطة مرجعية، بتعليق الثريا بشكل أقل قليلاً من قمة الدرج أو عند مستواها. بهذه الطريقة، عندما تكون في أعلى الدرج، سيكون الجزء العلوي من الثريا في مستوى عينيك.
      • من ناحية أخرى، يدعو العديد من المصممين إلى وضعها بشكل مستقل لجعل الثريا نقطة جذب بصرية، أو وضعها بما يتناسب مع عناصر معمارية أخرى. على سبيل المثال، إذا كانت هناك نافذة شفافة كبيرة فوق الباب، فيجب توسيطها في النافذة للحصول على أفضل نتيجة بصرية من الخارج.

      الممرات الطويلة

      يتم تحديد حجم الثريا للممرات حسب عرض الممر. اضرب عرض الممر بالقدم في 2.5 لتحصل على قطر الثريا بالبوصة.


      فعلى سبيل المثال، إذا كان عرض الممر 8 أقدام، يجب أن يكون قطر الثريا حوالي 20 (8 × 2.5) بوصة.

      إذا كنت ترغب في تزيين ممراتك الطويلة بالثريات، نوصي دائماً بأن تكون:

      • متموضعة في منتصف الممر.
      • بمسافة تتراوح بين 8 إلى 10 أقدام بين كل ثريا وأخرى.
      • مع وجود مسافة لا تقل عن 7 أقدام ونصف بين الأرضية وقاع الثريا.
      العلوم الشعبية حول درجة حرارة لون الإضاءة

      الميزات العامة لمنتجات وحدات الإضاءة

      ملاحظة هامة: الميزات الموضحة أدناه تنطبق بشكل عام على وحدات الإضاءة الخاصة بنا، ولا تضمن أن المنتج الذي تشاهده حالياً يتضمن هذه الميزات بالضرورة. يرجى الرجوع إلى قسم الوصف في صفحة المنتج للتحقق من خصائصه الوظيفية.

      1. الإصدار القابل للتعتيم:

        • مجهز بجهاز تحكم عن بعد، مما يتيح لك ضبط كل من السطوع ودرجة حرارة اللون.
        • غير متوافق مع مفاتيح التعتيم الجدارية.
      2. إصدار الألوان الثلاثة الذي يتم التحكم فيه عبر المفتاح:

        • يعمل باستخدام مفتاح الحائط الحالي لديك، مما يتيح الاختيار بين ثلاث درجات حرارة لونية محددة مسبقاً.
        • لا يحتوي على وظيفة ذاكرة؛ عند إطفاء الضوء وإعادة تشغيله، يعود الضوء إلى إعداده الافتراضي.
        • لا يمكن ضبطه ليحافظ على مصدر ضوء واحد بشكل دائم.

      فهم درجة حرارة اللون (مقاسة بالكلفن)

      تحدد درجة حرارة اللون النغمة البصرية للضوء، مما يؤثر على أجواء ووظائف مساحتك. إليك دليل لمساعدتك في الاختيار:

      • أبيض دافئ (2700-3300 كلفن):
        يوفر توهجاً ناعماً وجذاباً، ومثالي لخلق أجواء مريحة وهادئة في غرف المعيشة وغرف النوم ومناطق تناول الطعام.

      • ضوء محايد (3300-5300 كلفن):
        يوفر إضاءة مشرقة ومتوازنة تشبه ضوء النهار الطبيعي. مثالي للمطابخ والحمامات والمكاتب والمساحات التجارية حيث تعد الوضوح والتركيز أمراً أساسياً.

      • أبيض بارد (5300-6500 كلفن):
        ينتج ضوءاً حاداً ومنشطاً، مما يعزز التركيز والإنتاجية. الأنسب للمساحات التي تتطلب أداء مهام مثل ورش العمل والمرائب ومناطق العرض.

      نصيحة: اختر درجة حرارة اللون بناءً على الأنشطة والمزاج الذي ترغب في تحقيقه في مساحتك لضمان التناغم الوظيفي والجمالي.

      دليل حفر ثقوب دعامة التثبيت

      إشعار التركيب: دليل حفر ثقوب دعامة التثبيت

      أبعاد دقيقة | معايير التركيب | السلامة المهنية

      يوفر هذا الدليل ملاحظات عامة حول تركيب أنظمة الحفر ودعامات التثبيت لضمان دعم آمن ومستقر للتركيبات. بما أن ألواح التثبيت والتصاميم الهيكلية قد تختلف باختلاف موديلات الإضاءة، يجب دائماً تحديد مواضع الثقوب بدقة وفقاً للأجهزة الفعلية المرفقة مع كل منتج. قبل التركيب، تحقق بعناية من هيكل الدعامة وتأكد من اختيار جميع المثبتات أو البراغي بشكل صحيح وتثبيتها بإحكام. يجب أن تكون جميع نقاط التثبيت مستقرة تماماً ومسطحة مع سطح التركيب لضمان أداء مناسب لتحمل الأحمال وسلامة طويلة الأمد.

      أولاً: أساسيات ما قبل التركيب

      متطلبات الجدار

      يجب التركيب على طوب صلب أو خرسانة. يمنع التركيب على الطوب المفرغ أو ألواح الجبس. تأكد من استواء الجدار ضمن خطأ لا يتجاوز 0.5 مم.

      مواصفات الحفر

      تأكد من مواقع ثقوب الدعامة قبل الحفر. تختلف الأحجام حسب التركيبة. يحتاج كل لوح سقف إلى قياس محدد للمحاذاة.

      حمل السلامة

      الاستخدام القياسي: ≤15 كجم. الاستخدام الشاق: 30-50 كجم. ثبت كل 40-50 سم. يتطلب تركيب الأجهزة الكبيرة شخصين.

      ثانياً: التحضير والأدوات

      الأدوات الأساسية:
      مثقاب تصادمي ميزان مياه شريط قياس قلم تحديد مفك براغي مطرقة
      المواد الاستهلاكية:
      خوابير توسعة (فيشر) براغي ذاتية اللولبة مانع تسرب مقاوم للماء حشوات (شيمز)

      ثالثاً: مواصفات الموديلات ودليل الصور

      1. سلسلة الدعامات الثمانية

      دعامة ثمانية A1
      دعامة ثمانية A2
      دعامة ثمانية A3
      دعامة ثمانية A4
      دعامة ثمانية A8
      دعامة ثمانية ذات حواف
      دعامة فراشة نوع B

      2. دعامات دوارة وعرضية

      دعامة عرضية دوارة 105
      دعامة عرضية دوارة 2 في 1 (زنك ملون)
      دعامة عرضية دوارة 2 في 1 (زنك أبيض)

      3. خطافات مستقيمة (سلسلة خطية)

      خطاف مستقيم قياسي أمريكي (زنك أبيض)
      خطاف صفيحة حديدية 70 مم
      خطاف مستقيم 70 مم
      خطاف مستقيم 80 مم
      خطاف مستقيم 95 مم
      خطاف مستقيم 100 مم
      خطاف مستقيم قياسي أمريكي 100 مم
      خطاف عرضي 100 مم

      4. دعامات مفتوحة ومتعددة الوظائف

      دعامة ذات فتحة مفتوحة 75 مم
      دعامة ذات فتحة مفتوحة 95 مم
      دعامة ذات فتحة مفتوحة 115 مم
      دعامة مغلقة متعددة الوظائف 75 مم
      دعامة مغلقة متعددة الوظائف 95 مم
      دعامة مغلقة متعددة الوظائف 115 مم

      5. دعامات خاصة ودعامات مراوح

      دعامة على شكل قبعة 90 مم
      دعامة على شكل قبعة 110 مم
      دعامة على شكل قبعة 125 مم

      خطافات خاصة إضافية

      خطاف ثماني مطوي 105 مم
      خطاف ثماني أمريكي 102 مم
      خطاف مروحة 80 مم

      رابعاً: خطوات التركيب المعيارية

      • التحديد: استخدم ميزان مياه لضمان المحاذاة الأفقية. حدد مراكز الثقوب بناءً على المنتج الفعلي الذي استلمته.
      • الحفر: احفر بشكل عمودي. نظف الغبار وأدخل خوابير التوسعة (الفيشر).
      • التثبيت: حاذِ اللوح وقم بربط البراغي. اضبط المستوى بدقة قبل الإحكام.
      • العزل: استخدم مانع تسرب في المناطق الرطبة (المطبخ/الحمام) أو حشوات للأسطح غير المستوية.
      • الاختبار: قم بهز الجهاز يدوياً للتأكد من عدم وجود أي حركة قبل تحميل الوزن.

      خامساً: أخطاء شائعة يجب تجنبها

      ❌ التركيب على جدران مفرغة / ألواح جبس
      ✅ الحل: يجب استخدام دعامات تقوية أو ألواح خلفية أولاً.
      ❌ تجاهل الاستواء (التقدير البصري)
      ✅ الحل: استخدم دائماً ميزان مياه لمنع الإجهاد غير المتساوي.
      ❌ عدم ترك فجوة تمدد في المناطق الرطبة
      ✅ الحل: اترك فجوة 6 مم لمنع الاعوجاج الناتج عن التمدد الحراري.
      نصائح التركيب

      تركيب الثريا: دليل شامل من Metavaya

      تُعد الثريات إضافة خالدة لأي منزل، حيث تضفي عليه لمسة من الأناقة والوظائف العملية. سواء تم تركيبها فوق جزيرة المطبخ، أو طاولة الطعام، أو في الردهة، يمكن للثريا أن تحول مساحتك إلى مكان مميز. في Metavaya، نريد أن تشعر بالثقة طوال عملية التركيب. اتبع دليلنا خطوة بخطوة، وسرعان ما ستستمتع بغرفة مضاءة بشكل جميل!

      الخطوة 1: التحضير
      قبل البدء، تأكد من توفر جميع الأدوات واتباع بروتوكولات السلامة.

      الأدوات التي ستحتاجها:
      سلم، كماشة، أداة تعرية الأسلاك، مفكات براغي، مثقاب كهربائي (اختياري)، ريشة ثقب (اختيارية)

      Lighting installation tools: ladder, pliers, wire strippers and screwdrivers; optional power drill and drill bit.


      السلامة أولاً:
      افصل التيار الكهربائي: أغلق مصدر الطاقة من لوحة القواطع للغرفة التي تعمل بها.
      اختبر وجود تيار كهربائي: استخدم جهاز فحص الجهد على الأسلاك أو وحدة الإنارة للتأكد من عدم وجود تيار كهربائي سارٍ.
      أزل وحدة الإنارة القديمة: قم بفك البراغي وفصل وحدة الإنارة الموجودة بعناية. احتفظ بالبراغي أو أدوات التثبيت، فقد تكون مفيدة للوحدة الجديدة.

      how to install chandelier - turn off the power | Sofary
      الخطوة 2: تجميع الثريا
      ضع جميع الأجزاء وقم بتجميع وحدتك وفقاً لتعليمات الشركة المصنعة.

      نظم المكونات: افرد جميع الأجزاء على سطح مستوٍ لسهولة الوصول إليها.
      التجميع المسبق للأجزاء: قم بتركيب القضبان، أو السلاسل، أو العناصر الزخرفية، واضبط ارتفاع التعليق حسب تفضيلك.
      تثبيت الديكورات: قم بتركيب الظلال (أغطية المصابيح)، أو الكريستالات، أو أي عناصر زخرفية أخرى أثناء وجودك على الأرض لتبسيط عملية التركيب.
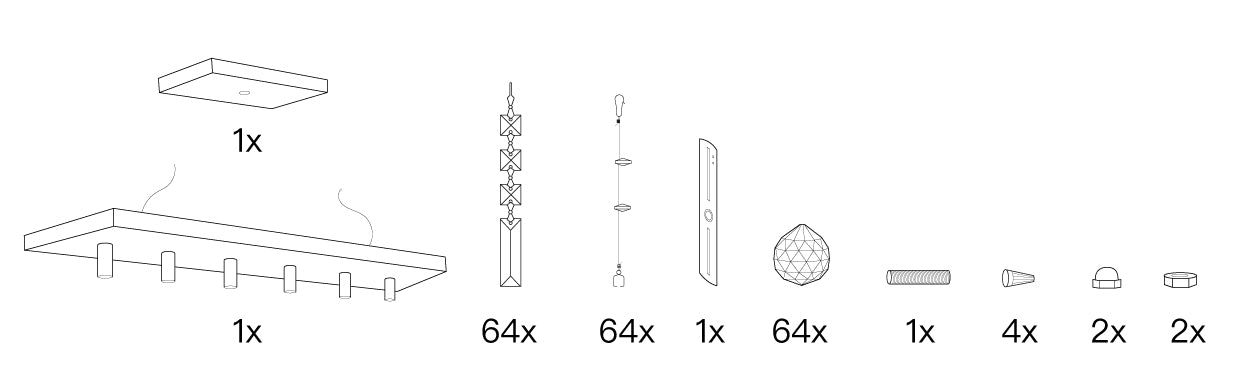
      How To Install Chandelier- Product Accessories | Sofary
      الخطوة 3: تركيب دعامة التثبيت
      تعد دعامة التثبيت أمراً حيوياً للحصول على وحدة ثابتة وآمنة.

      تركيب الدعامة: قم بتثبيتها في صندوق التوصيل بالسقف باستخدام البراغي المرفقة.
      تحقق من الثبات: اسحب الدعامة برفق للتأكد من أنها مثبتة بإحكام في مكانها. بالنسبة للوحدات الأثقل وزناً، استخدم دعامة مروحة أو دعماً إضافياً.
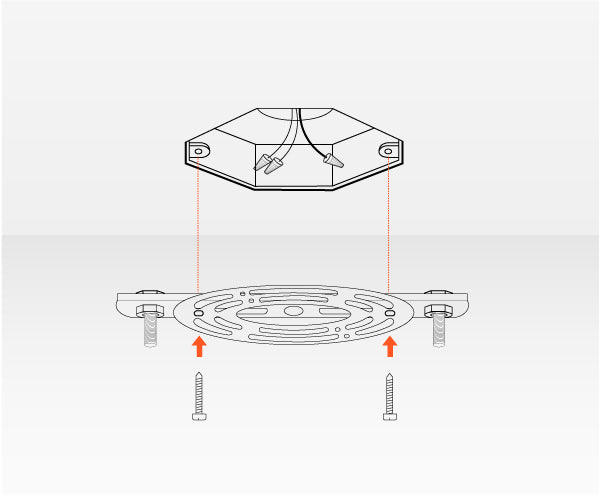
      How To Install Chandelier- install the mounting bracket | Sofary
      الخطوة 4: توصيل الأسلاك
      تعد التوصيلات الكهربائية خطوة حاسمة - احرص على اتباع هذه الإرشادات:

      حدد الأسلاك:

      الأسود: السلك الحي/الحار
      الأبيض: السلك المحايد
      الأخضر/النحاسي العاري: سلك التأريض
      تعليمات التوصيل:

      سلك التأريض: صل سلك تأريض الثريا بسلك تأريض صندوق التوصيل وثبته باستخدام موصل.
      الأسلاك المحايدة: قم بلف الأسلاك البيضاء معاً وثبتها باستخدام موصل أسلاك.
      الأسلاك الحية: قم بتوصيل الأسلاك السوداء وثبتها.
      تحقق مرة أخرى من التوصيلات: اسحب كل توصيلة برفق للتأكد من ثباتها وعدم وجود أسلاك عارية مكشوفة.

      نصيحة: إذا كنت غير متأكد بشأن التوصيلات الكهربائية، استشر كهربائياً مرخصاً.
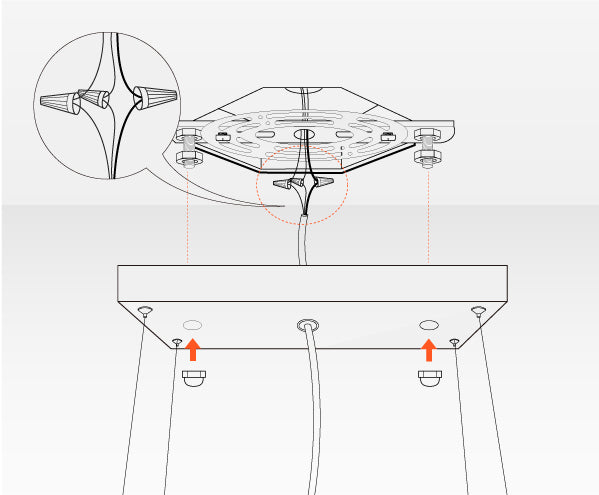
      كيفية تركيب الثريا - تثبيت حامل التركيب | Sofary

      الخطوة 5: تركيب الثريا
      قم بتركيب وحدتك على الدعامة.

      تثبيت الوحدة: قم بمحاذاة الثريا مع دعامة التثبيت واستخدم البراغي أو الصواميل لربطها.
      ضبط المحاذاة: تأكد من أن الثريا معلقة بشكل مستوٍ وعلى الارتفاع الصحيح قبل إحكام الربط تماماً.
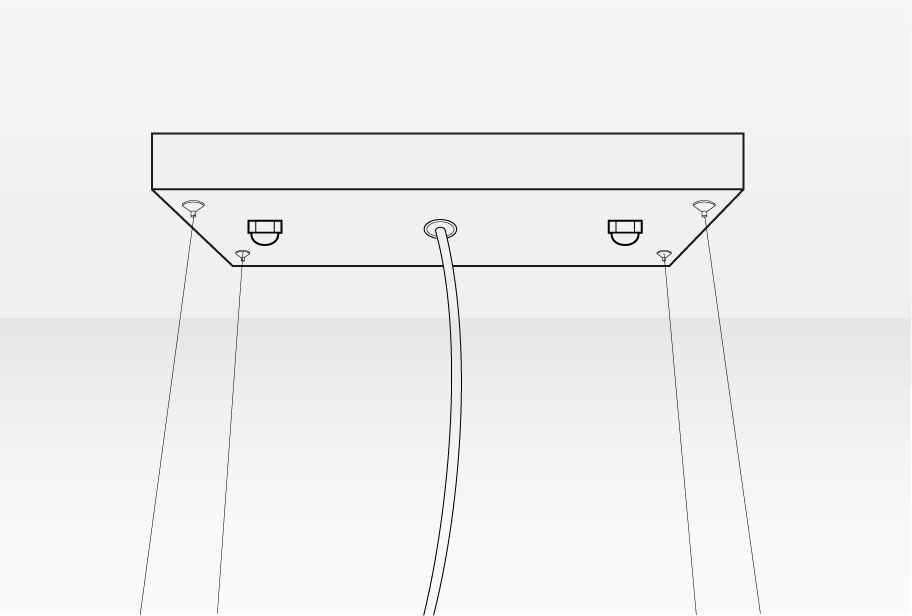
      كيفية تركيب الثريا - توصيل الأسلاك وتركيب الغطاء العلوي | Sofary
      الخطوة 6: اللمسات النهائية
      أضف اللمسات الأخيرة لوحدتك.

      أدخل المصابيح: استخدم القوة الكهربائية والنوع الموصى به لثريتك.
      قم بتركيب الظلال أو الأغطية: ثبت أي ظلال أو أغطية لم يتم تركيبها مسبقاً.
      فحص الثبات: تأكد من أن جميع المكونات مثبتة بإحكام وأن الوحدة معلقة بشكل مستوٍ.
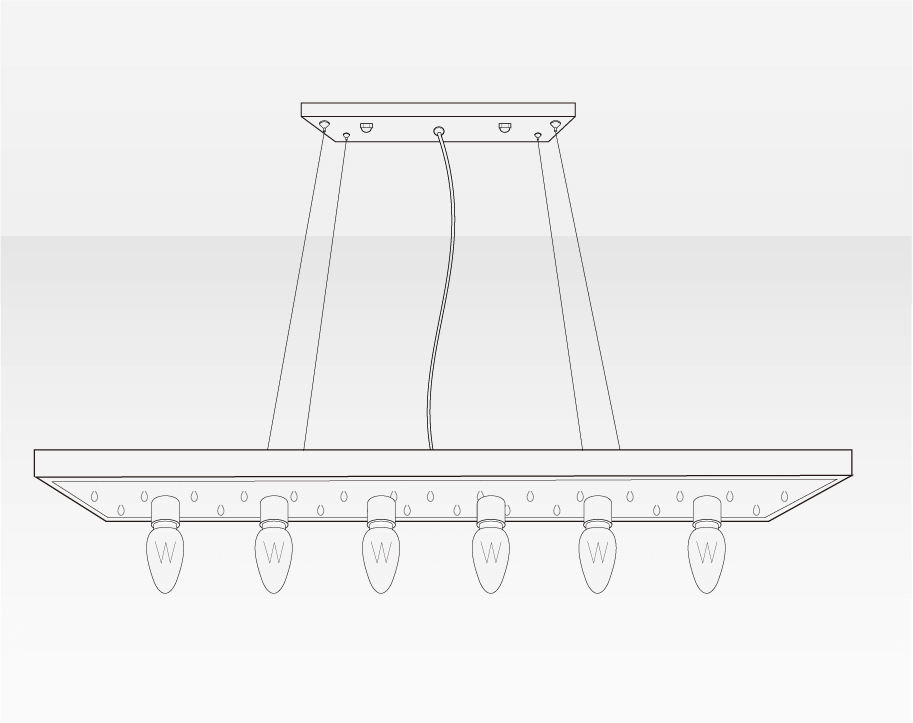
      كيفية تركيب الثريا - تركيب اللمبة | Sofary
      الخطوة 7: اختبر إضاءتك
      أعد التيار الكهربائي واستمتع بإضاءتك الجديدة!

      أعد التيار الكهربائي: أعد تشغيل قاطع الدائرة.
      اضغط على المفتاح: قم بتشغيل الثريا للتحقق من عملها.
      قم بإجراء تعديلات نهائية: تراجع للخلف لتقييم الارتفاع والمحاذاة، وقم بإجراء أي تعديلات ضرورية.

      نصائح إضافية لتركيب الثريا
      الارتفاعات المثالية:

      • جزيرة المطبخ/سطح العمل: 30–36 بوصة فوق السطح.


      • طاولة الطعام: 30–34 بوصة من الطاولة إلى أسفل الوحدة.


      • الردهات/المساحات المفتوحة: حافظ على خلوص لا يقل عن 7.5 قدم من الأرضية.


      دعم الوحدات الثقيلة:
      تأكد من أن صندوق التوصيل بالسقف والدعامة يمكنهما تحمل وزن الثريا. بالنسبة للوحدات الثقيلة، استخدم دعماً إضافياً مثل دعامة مروحة.

      المساعدة المهنية:
      إذا كنت غير متأكد من التوصيلات الكهربائية أو ترغب في ضمان الامتثال لقوانين البناء، استعن بكهربائي مرخص لراحة بالك.

      الخطوة 8: التحقق

      تهانينا، لقد أكملت تركيب ثريتك! هناك شيء أخير يجب القيام به وهو التحقق منها من مسافة بعيدة للتأكد فقط من أن الثريا مستوية وعلى الارتفاع المناسب. يمكنك إجراء تعديلات إضافية بسيطة حسب الحاجة. بعد التأكد من السلامة، يمكنك تشغيل مفتاح الطاقة الرئيسي لمنزلك ومفتاح الإضاءة الخاص بالثريا. الآن يمكنك الاستمتاع بالثريا الجميلة التي قمت للتو بتركيبها في منزلك. 

      نأمل أن تكون هذه المدونة قد قدمت لك نظرة عامة حول عملية تركيب الثريا بالإضافة إلى إرشادات خطوة بخطوة عند قيامك بالتركيب. إذا كان لديك أي أسئلة، فلا تتردد في الاتصال بنا، ونحن دائماً هنا للمساعدة!

      الرسوم والضرائب

      الرسوم الجمركية والضرائب


      يرجى العلم بأن جميع الأسعار المعروضة على موقعنا لا تشمل الرسوم الجمركية أو الضرائب المحلية أو أي رسوم استيراد أخرى. في معظم الحالات، تمر طرودنا عبر الجمارك دون فرض ضريبة القيمة المضافة. ومع ذلك، بالنسبة للطلبات الكبيرة أو في ظروف معينة، قد نحتاج إلى تقديم معلومات إضافية للجمارك والتعاون مع المشتري لتوفير الأوراق المطلوبة.

      لكل بلد وجهة حد أدنى خاص لضريبة الاستيراد، وهو ما يحدد قيمة البضائع التي يمكن استيرادها قبل فرض رسوم الاستيراد. لا يتم تضمين رسوم الاستيراد والضرائب والرسوم الأخرى في سعر السلعة أو تكلفة الشحن. تقع هذه الرسوم على عاتق المشتري، ونحن لسنا مسؤولين عن أي تأخير تسببه سلطات الجمارك في بلدك.

      لمزيد من التفاصيل بخصوص الرسوم المطبقة، نوصي بالاتصال بمكتب الجمارك المحلي الخاص بك.

      وصف المنتج

      METAVAYA · SCULPTURAL WALL LIGHTS

      Ondine Wave Glass Wall Sconce

      Thick ribbons of hand-formed glass, each one bent into a slow wave and hung over a metal rod, in three courses that step forward and back. The outline is square; every edge of it ripples. At eye level, where a wall light actually lives, that is close enough to read the texture in the glass — and close enough for the three bulbs inside to throw a wave of their own across the wall behind.

      10.2″
      square · 26 × 26 cm
      8 finishes
      4 glasses × 2 metals
      3 bulbs
      E12 / E14 · not included
      60–66″
      Mount centre · from floor
      Hand-formed Wave GlassGold or Black MetalHardwired Flush Mount
      Ondine wave glass wall sconce — hero · the sconce

      01
      At a glance

      Specification details

      One size, eight finish combinations, three bulbs. Everything below is what the fixture is and how it goes on the wall — check the mounting height and the switch against your room before you order.

      Ondine wave glass wall sconce — dimension reference
      THREE COURSES
      DRAPED GLASS RIBBONS
      GOLD OR BLACK METAL
      HARDWIRED FLUSH MOUNT
      Build
      Materials Textured glass + metal frame
      Frame, rods & backplate Metal — gold or black finish
      Finishes Amber · Smoke grey · Clear · Green, each with Gold or Black
      Size
      10.2″ × 10.2″ (26 × 26 cm) — one size
      Light
      Light source E12 / E14 small screw base — LED or Edison bulb, not included
      Bulbs 3 sockets
      Dimming With dimmable bulbs on a compatible wall dimmer
      Mounting
      Mounting Flush wall mount, hardwired to a wall junction box
      Mount height Centre 60–66″ / 152–168 cm from the floor
      Control Standard wall switch, not supplied
      Voltage AC 110–240V
      Placement Indoor dry locations only

      02
      Mounting guide

      One size, and three heights that decide how it reads

      A wall sconce has only one measurement that really matters, and it is not the fixture — it is how high you put it. Centre it at 60–66″ and the glass sits at standing eye level, where the texture reads and the glare does not. Beside a mirror and beside a bed the rules change, and both are below.

      Standing eye level 60–66″ to the centre 10.2″ wide × 10.2″ high Top course sits back it throws light up the wall Middle course carries the bulbs three of them, behind the glass Lower course closes the base no bare socket visible from below

      60–66″ on an open wall

      Measured from the floor to the centre of the fixture — roughly standing eye level. Higher and you lose the texture in the glass; lower and the bulbs come into direct view as you walk past.

      36–40″ apart beside a mirror

      Flanking a vanity or entry mirror, set the pair 36–40″ apart with their centres at roughly 65″. Light arriving from both sides at face height is the reason sconces beat a light above the mirror.

      8–10 ft apart down a hallway

      A run of sconces wants an even rhythm, not a crowd. Eight to ten feet between centres keeps the pools of light reading as one sequence rather than as separate lamps.

      Before you order

      Beside a bed, drop the height

      A bedside sconce is read while you are sitting, not standing. Mount the centre at 30–36″ above the mattress and set it 6–10″ out from the edge of the bed, so the light falls on a page rather than into the other person’s eyes. Done this way, the pair frees both nightstands completely.

      Switching

      It is wired, not plugged

      The sconce hardwires to a wall junction box and runs from your own wall switch, which is not supplied. If there is no box where you want the light, that is an electrician’s job and worth settling before the fixture arrives — it decides the height as much as the rule above does.


      03
      Finishes

      Four glasses, two metals, eight combinations

      The glass decides the colour of the light; the metal decides how much structure you see behind it. Gold warms the glass and half disappears into it. Black draws every rod as a line, so you read the frame and the ribbons as two separate things.

      With gold metal
      Ondine wave glass wall sconce — amber gold

      Amber & gold

      The warmest pairing of the eight. Lit, the whole fixture goes the colour of a lantern; unlit it reads as honey-coloured stone. The one for a hallway or a dining wall, where warm light on faces is the job.

      Ondine wave glass wall sconce — smoke grey gold

      Smoke grey & gold

      Grey glass over warm metal — the light stays neutral while the frame keeps it from feeling cold. The texture in the glass reads harder here than it does in amber, because less colour is in the way.

      Ondine wave glass wall sconce — clear gold

      Clear & gold

      The brightest of the eight. The bulbs stay visible through the ribbons, so the sconce reads as light first and object second. Use a decorative filament bulb — with clear glass the bulb is part of the design.

      Ondine wave glass wall sconce — green gold

      Green & gold

      Bottle green, almost opaque unlit, warming to olive-gold the moment it is switched on. The strongest colour in the range and the one that most obviously reads as a material rather than a shade.

      With black metal
      Ondine wave glass wall sconce — amber black

      Amber & black

      The same warm glass with a hard outline behind it. Each rod stays visible as a dark line, so you read the three courses before you read the colour — the sharper way to use amber.

      Ondine wave glass wall sconce — smoke grey black

      Smoke grey & black

      The most restrained combination in the range. Grey glass, black frame, nothing warm anywhere — it sits with steel windows, dark joinery and painted walls without arguing with any of them.

      Ondine wave glass wall sconce — clear black

      Clear & black

      The most graphic of the eight. Clear ribbons against black rods turn the fixture into a drawing of itself: you see the structure completely, and the only colour in it is the bulb.

      Ondine wave glass wall sconce — green black

      Green & black

      Deepest of the eight. The black frame pulls the green darker still unlit, which makes the switch-on more of an event — the colour arrives all at once rather than being there all along.

      Gold metal

      Warm, low-sheen gold. Behind glass it half disappears, so the sconce reads as one mass of colour. The usual choice with amber and green, and with warm wood, plaster, and brass fittings elsewhere in the room.

      Black metal

      Matt black that holds its own line against the glass. Every rod stays legible, which suits clear and smoke grey, and picks up black window frames, dark cabinetry and painted trim.


      04
      The glow

      Light through the glass, and light on the wall

      Three bulbs sit behind the middle course, not one in the centre, so the light leaves the fixture through every ribbon at a slightly different angle. Some of it comes forward through the glass; the rest escapes between the ribbons and lands on the wall. That second half is the part most wall lights never give you.

      Lights off

      Three courses of textured glass on metal — an object on the wall before it is ever a lamp.

      Lights on

      Every ribbon takes the bulbs at its own angle, so the fixture shimmers rather than glares.

      Buy all three bulbs in the same brand and the same colour temperature. In a fixture this small, with three sources this close together, one odd bulb is obvious from the other side of the room.

      2700K
      Candlelit — deepens amber and green, warms clear
      3000K
      Our pick — warm, and true to every one of the four glasses
      4000K+
      Not advised — cool white greys the glass and flattens the texture

      05
      The form

      A square outline, made entirely of curves

      Every piece of glass on this sconce is the same shape: a thick ribbon with a wave down each long edge, bent over a metal rod so both ends hang free. Line them up and the courses square off into a block; look at any edge of that block and it ripples. That contradiction — square from across the room, curved from arm’s length — is the whole design.

      ONE RIBBON, OVER ONE ROD Hooked over the rod not clipped, screwed or glued A wave down each edge formed hot, not cut to shape Both ends hang free so each one finds its own angle One ribbon, folded over its rod THREE COURSES, FROM THE FRONT Square in outline — 10.2″ across, 10.2″ high Every edge of that square ripples

      06
      Construction

      Ribbon, rod and backplate — the three parts in detail

      Three components make up the whole fixture, and there is no fourth hiding anywhere. Below, each one at close range: how it is made, what it does structurally, and what it contributes to the light.


      01

      Hand-formed glass ribbon

      Thick enough to hold its own shape, worked while hot so the wave down each edge and the texture through the body are set in the same moment. Every ribbon on the fixture is formed this way, and no two are identical.

      Ondine wave glass wall sconce — 02 the metal rod
      02

      Metal rod and frame

      Each course hangs from a single round rod carried on the frame. The rod takes all the weight and sets the spacing; because it is round and thin, it reads as a drawn line behind the glass rather than as a bracket.

      Ondine wave glass wall sconce — 03 backplate fixing
      03

      Backplate and fixing

      A flat metal plate covers the junction box and carries the frame out from the wall. It mounts flush, so there is no visible conduit and no gap between the fixture and the plaster once it is up.


      07
      Materials

      Texture worked into the glass, not printed on it

      The wave and the texture are both formed while the glass is still soft, so they run through the body of each ribbon rather than sitting on its surface. A chipped edge would show the same texture and the same colour all the way through.

      Ondine wave glass wall sconce — material macro
      THE MATERIAL STORY 01 / 04

      Why the pairing works

      Thick textured glass against thin flat metal. The glass does all the optical work — refracting, scattering and colouring — while the metal does none of it. At eye level, where every detail is visible, that division of labour is what keeps the fixture calm.

      01
      Texture formed hot

      Worked into the glass while it is soft, so it refracts through the full thickness of the ribbon instead of scattering at the surface. It is what turns three bulbs into dozens of highlights.

      02
      Colour in the batch

      Amber, smoke grey and green are melted into the glass itself rather than sprayed on, which is why the colour reads as depth and why a chipped edge would be the same colour right through.

      03
      Metal kept thin and flat

      Gold or black, with no texture of its own. The rods are drawn as fine as the weight allows, so what you see behind the glass is a line rather than a bracket.

      04
      Built for close inspection

      A wall sconce is looked at from a foot away, which hides nothing. Edges, joints and the back of the frame are finished to the same standard as the face.

      A closer look at the finish
      Hand-formed wave glassDraped over metal rodsGold or black metal

      Designed to hold its own as an object, whether the sconce is switched on or off.


      08
      Placement

      Six walls, and how many it takes

      Wall lights do their best work in pairs and rhythms, not alone. Six positions that work, and whether to order one, two or a run.

      Ondine wave glass wall sconce — hallway

      Hallway

      A run of three or four, 8–10 ft between centres, turning a corridor into a sequence.

      Ondine wave glass wall sconce — vanity or entry mirror

      Vanity or entry mirror

      A pair, 36–40″ apart, lighting a face from both sides instead of from above.

      Ondine wave glass wall sconce — bedside

      Bedside

      A pair at 30–36″ above the mattress — it frees both nightstands completely.

      Ondine wave glass wall sconce — living room

      Living room

      A pair flanking a fireplace, a sofa or a piece of art, at standing eye level.

      Ondine wave glass wall sconce — lounge

      Lounge

      A pair either side of the reading corner, lighting the chair rather than the whole room.

      Ondine wave glass wall sconce — dining room

      Dining room

      A pair on the long wall, matched to an Ondine chandelier over the table.


      09
      Glassmaking

      Formed, annealed and finished — one ribbon at a time

      Four stages between the furnace and the finished sconce, and every ribbon on the fixture passes through all four. Nothing is rushed at the cooling stage, because that is what the long-term strength and clarity of the glass depend on.

      Ondine wave glass wall sconce — 01 forming
      01

      Glass forming & shaping

      Molten glass is blown or moulded to achieve balanced proportions, smooth contours and precise optical clarity.

      Ondine wave glass wall sconce — 02 annealing
      02

      Controlled cooling & annealing

      Gradual, controlled cooling removes internal stress — enhancing the glass’s long-term strength, clarity and durability.

      Ondine wave glass wall sconce — 03 finishing
      03

      Hand finishing & detailing

      Edges and surfaces are refined by skilled artisans, creating a clean, elegant finish that catches the light beautifully.

      Ondine wave glass wall sconce — 04 assembly
      04

      Assembly & light testing

      Each sconce is assembled with precision hardware and individually tested to ensure even light diffusion before it is packed.

      Signs of the hand, not flaws

      Texture varies

      The surface runs coarser on some ribbons than others.

      Colour varies

      Depth of colour differs ribbon to ribbon across one course.

      Small bubbles

      Trapped in the glass as it cooled.


      10
      FAQ

      Questions, answered

      The ten questions customers ask most often before ordering a wall sconce.

      Choosing & placing
      How high should it be mounted?

      Centre the fixture 60–66″ (152–168 cm) from the floor on an open wall — roughly standing eye level. Beside a bed, drop it to 30–36″ above the mattress, because there you read it sitting down.

      How far apart should a pair go?

      Flanking a mirror, 36–40″ between centres. Down a hallway, 8–10 ft. Either side of a bed, 6–10″ out from the edge of the mattress. The spacing matters more than the exact height.

      Should I buy one or two?

      Two, in most positions. A single sconce lights one spot and looks like a leftover; a pair reads as a deliberate decision and lights a face or a mirror evenly from both sides. Corridors and staircases are the exception, where a run of three or four is the point.

      Which glass and metal should I pick?

      Gold warms the glass and half disappears into it; black keeps every rod visible so you read the structure. Amber is the warmest and best in a hallway or dining room, green the strongest colour, smoke grey the most restrained, clear the brightest — and with clear, the bulb you choose becomes part of the design.

      Will mine look exactly like the photographs?

      Very close, but every ribbon is formed, textured and cooled by hand, so the wave, the depth of colour and the odd trapped bubble differ from ribbon to ribbon and sconce to sconce. That variation is the material, not a defect — and it is why a pair never looks machine-matched.

      Bulbs, install & care
      How many bulbs does it take, and which?

      Three, small screw-base — E14 in Europe, E12 in North America. None are included. Warm white at 2700–3000K suits all four glasses; 4000K and cooler greys the glass and flattens the pattern it throws on the wall.

      Why are no bulbs included?

      Fittings differ by country, the right bulb depends on which glass you chose, and glass bulbs rarely survive a long shipment intact. Buying locally gets you the right base, the right brightness and no broken glass in the box.

      Is it dimmable?

      The sconce has no dimmer of its own and runs from a standard wall switch, which is not supplied. Fit dimmable bulbs and wire it to a compatible dimmer and you control the level — worth doing, because this fixture is at its best turned down.

      Is it hardwired, and can I use it in a bathroom?

      Hardwired to a wall junction box and controlled by your own wall switch; a licensed electrician is recommended. It is rated for indoor dry locations, so beside a vanity mirror in a dry, well-ventilated bathroom is fine — directly above a tub or inside a shower is not.

      How should I clean it?

      Switch it off at the wall and let the bulbs cool, then wipe the glass with a soft lint-free cloth, barely damp, and dry it straight away. Wipe the metal with a dry cloth only. Avoid abrasive pads, solvents and metal polish, which mark both the texture and the finish.

      Planning a pair, a hallway run, or a whole-house scheme?

      Contact Metavaya before you order and we’ll work the spacing and the heights out with you.

      Contact Metavaya

      نعدكم بذلك!

      آخر الأخبار